Authentication with Passport.js - Part 4. JWT & React.js
The source code is available on Github. If you found any error in the codes below, please refer to the codes on Github. They shall work properly.
This is the last tutorial of four that show you how to implement and use Node.js authentication middleware Passport.js.
- Basic
- MongoDB & Signup
- Hashing & Remember me
- JWT & React.js
In this tutorial, to make the application more practical to the current real world development, we will focus on front-end authentication, using JSON Web Token a.k.a. JWT and React.js. JWT is commonly, not specifically, used for authorization process being sent within API requests in order to identify who the request sender is and to confirm he or she has a right permission.
In the preceding tutorials, our application issues to a user a cookie that stores session ID at the authentication of user. Instead, by the end of this tutorial the application will issue JWT.
Figure 1 shows the overview of our application structure on both back and front-end.
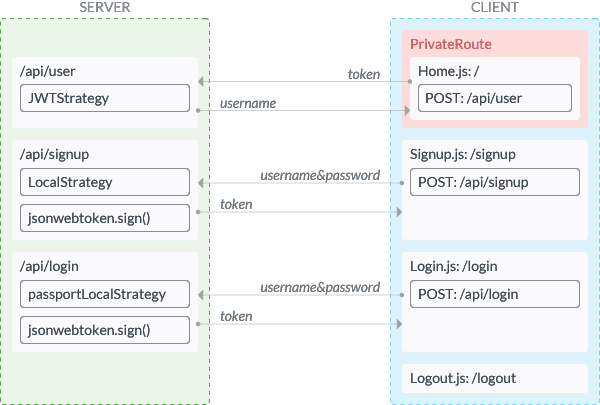
While our application in the last tutorial was a full-stack server, it will evolve into the API server that just receives API requests from the client. This API serve has only three entry points: /api/user, /api/signup, and /api/login. Each route of entry points handles the process as their entry point names indicate. For the front-end development we will rely on create-react-app, which uses Webpack dev server as its server. React Router will be used for client side routing.
The end result of our codes is still rudimentary. The primary intention of this article is to show you the basic of how to authenticate a user with Passport.js and JWT. If you wonder how to push it to the production level, please read Further Concerns section.
Prerequisites
Inside () are the versions of software that I used for testing. The application is developed very simply, so I believe it is unlikely that errors would happen due to the version difference. Yet, if you encounter any error that cannot be solved easily, please look up the version. Also, by the time of your reading, NPM packages might be updated to the next version. In which case, please check out their official documentation to apply the code below. The versions of NPM packages are found in package.json on Github.
If you don’t have Yarn, please replace yarn with corresponding npm command.
Preparation
In this section, I assume that readers use Apple’s computers. Sorry for windows or linux users. If you are not a Mac user, please proceed with the corresponding operations based on your operating system.
Before delve into how to make an application, let us prepare what we need for the development: database, modules, and files. While you are following this tutorial, please open three Terminal windows or tabs for running MongoDB daemon, Express server, and Webpack server.
Database
The step differs based on whether you have followed the last tutorial or not. Please follow the right subsection below for you.
Either case, please make sure that while you are following this tutorial you are running Mongo daemon with mongod --config /usr/local/etc/mongod.conf. Plus, if you use the database named other than passport, please do not forget to replace the database name with yours in the code.
If you have followed the last tutorial…
There is nothing you should do with database. Just skip to Modulessection.
If you haven’t followed the last tutorial…
Please refer to Preparation — Database section of the previous article and follow the guidance.
If you have followed the part 2 but not 3 of this tutorial series, you need to remove all user information so that the password will be stored in hashed. In which case, please do as follows:
$ mongo

> use passport;
> db.users.deleteMany({});
> db.users.find() # Must return nothing
> exit;
Modules
We use create-react-app to initiate our project, so please execute the following commands:
$ mkdir passport-example # Skipped this if you’ve done the previous tutorial
$ cd passport-example

$ npx create-react-app 04-jwt-react
# Or if you have it locally
$ create-react-app 04-jwt-react

$ cd 04-jwt-react
After that, please install NPM packages with:
$ yarn add passport passport-local passport-jwt jsonwebtoken
$ yarn add express body-parser connect-flash
$ yarn add mongoose
$ yarn add bcrypt
$ yarn add react-router-dom
If you haven not used bcrypt before on your computer, you might have a trouble installing the module. If that’s the case, please check out bcrypt - npm and follow its installation guideline.
Files
The file structure of this application is as follows:
.
├─ db
│  └─ User.js
├─ lib
│  └─ passport-control.js
├─ public
│  └─ index.html
├─ routes
│  └─ index.js
├─ server.js
└─ src
   ├─ App.js
   ├─ component
   │  ├─ Home.js
   │  ├─ Login.js
   │  ├─ Logout.js
   │  ├─ Navigation.js
   │  └─ Signup.js
   ├─ index.js
   └─ lib
      ├─ PrivateRoute.js
      └─ isAuthenticated.js
Please make the files above now or when we need them. The files for back-end server can be mostly copied from the previous tutorial. Only a few changes will be added. Since the purpose of this article is on Passport+JWT and React, let’s add codes that are not related to these topic to each files at this point.
./db/Users.js
const mongoose = require('mongoose'),
      bcrypt = require('bcrypt')

// Mongoose Model
var userSchema = new mongoose.Schema({
  username: {
    type: String,
    index: true,
    unique: true,
    minlength: 2,
    maxlength: 16,
    lowercase: true,
    required: true,

  },
  password: {
    type: String,
    required: true,
  }
})

// Hash password before saving
userSchema.pre('save', function(next) {
  var user = this

  // If not registration
  if ( !user.isModified('password') ) return next()

  bcrypt.hash(user.password, 10, (err, hash) => {
    if (err) {
      return next(err)
    }
    user.password = hash
    next()
  })
})

// Password verification
userSchema.methods.login = function(password) {
  var user = this
  return new Promise((resolve, reject) => {
    bcrypt.compare(password, user.password, (err, result) => {
      if ( err ) { reject(err) }
      resolve()
    })
  })
}

// Export Mongoose "User" model
module.exports = mongoose.model('User', userSchema)
./lib/passport-control.js
const passport = require('passport'),
      Strategy = require('passport-local').Strategy,
      User = require('../db/User')

// Local Strategy
passport.use(new Strategy( (username, password, done) => {
  User.findOne({username: username}, (err, user) => {

    // If any error
    if (err) { return done(err) }

    if (!user) {
      return done(null, false, {
        message: 'No user found.'
      })
    }

    user.login(password).then(() => {
       return done(null, user)
    }).catch((err) => {
      return done(err, false, {
        message: 'Password not matched.'
      })
    })
  })
}))

module.exports = passport
./server.js
// Common modules
const path = require('path')

// MongoDB
const mongoose = require('mongoose')
mongoose.connect('mongodb://localhost:27017/passport', {useNewUrlParser: true, useCreateIndex: true})

// Initializing Express
const express = require('express'),
      app = express(),
      port = 4000

// Middlewares
const bodyParser = require('body-parser'),
      flash = require('connect-flash'),
      passportControl = require('./lib/passport-control')

app.use(bodyParser.urlencoded({ extended: false }))
app.use(express.static(path.join(__dirname, 'public')))
app.use(passportControl.initialize())

// Routers
app.use('/api', require('./routes'))

// Run server
app.listen(port, () => console.log(`Example app listening on port ${port}!`))
We will access our application at localhost:3000, which is a Webpack server run by react-scripts, proxying to the Express server above, which runs at localhost:4000
The following three files are the core of our client side application.
./src/index.js
import React from 'react'
import ReactDOM from 'react-dom'
import { BrowserRouter } from 'react-router-dom'
import App from './App'

ReactDOM.render(
  <BrowserRouter>
    <App />
  </BrowserRouter>,
  document.getElementById('root')
)
./src/App.js
import React from 'react'
import { Switch, Route } from 'react-router-dom'

import PrivateRoute from './lib/PrivateRoute'

import Navigation from './component/Navigation'
import Home from './component/Home'
import Signup from './component/Signup'
import Login from './component/Login'
import Logout from './component/Logout'

const App = () => (
  <div>
    <Navigation />
    <main>
      <Switch>
        <PrivateRoute exact path="/" component={Home} />
        <Route path="/signup" component={Signup} />
        <Route path="/login" component={Login} />
        <Route path="/logout" component={Logout} />
      </Switch>
    </main>
  </div>
)

export default App
./src/component/Navigation.js
import React from 'react'
import { Link } from 'react-router-dom'
// import isAuthenticated from '../lib/isAuthenticated'

 const Navigation = () => (
  <nav>
    <ul style={{display: 'flex',listStyle: 'none'}}>
      <li style={{margin: '0 1em'}}><Link to="/">Home</Link></li>
      <li style={{margin: '0 1em'}}><Link to="/signup">Signup</Link></li>
      <li style={{margin: '0 1em'}}><Link to="/login">Login</Link></li>
      <li style={{margin: '0 1em'}}><Link to="/logout">Logout</Link></li>
    </ul>
  </nav>
)

export default Navigation
Lastly, please add proxy parameter to the package.json so that our Webpack dev server proxy requests to our back-end server:
./pacakge.json
{
  …,
  "proxy": "http://localhost:4000"
}
The rest of codes come with some explanations.
Issue JWT
This section shows you how to issue JWT at the user’s authentication. At this point you don’t need to implement JWT strategy for your Passport, only local strategy is necessary just like in the preceding tutorials. You are going to use the same local strategy that’s being used; a user sends the username and password, the app pulls out the user data from the database, sees if the passwords match, let them login if they are matched.
What we should do here is to upgrade our application so that it issues JWT instead of cookie containing session information. To do this we must make a few changes to our routers for sign up and log in. Let’s add those routers to ./routes/index.js.
./routes/index.js
const express = require('express'),
      passport = require('passport'),
      jwt = require('jsonwebtoken'),
      User = require('../db/User'),
      router = express.Router()

/* API entrypoints */
// Singup
router.post('/signup', (req, res) => {
  var user = new User({
    username: req.body.username,
    password: req.body.password
  })

  user.save().then(() => {

    // Token
    const token = jwt.sign({id: user.id}, 'jwt_secret')
    res.json({token: token})

  }).catch((err) => {
    res.status().json({})
  })
})

// Login
router.post('/login', passport.authenticate('local', {
  session: false
}), (req, res) => {

  // Token
  const token = jwt.sign({id: req.user.id}, 'jwt_secret')

  res.json({token: token})
})

module.exports = router
As you can imagine, the routers that need to issue JWT are signup and login. We use jwt.sign() of jsonwebtoken package to create JWT, passing the payload {id: user.id} and the secret/privateKey jwt_secret. The routers, then, return that generated tokens in the JSON format. Since our application moved on to the front-end driven, requests are sent asynchronously from the front-end. That’s why we don’t use req.render or req.redirect.
Client side pages that send requests that must go through the local strategy are /login and /signup. The logic of those two pages is identical, only to which API entry point the request must be sent is different. I will provide the code for the login page down the below to reduce the length of article, but you can always refer to Github if you want the source.
./src/component/Login.js
import React, { Component } from 'react'
import { Redirect } from 'react-router-dom'
import isAuthenticated from '../lib/isAuthenticated'

export default class Login extends Component {

  constructor(props) {
    super(props)

    this.state = {
      loggedin: isAuthenticated()
    }
  }

  submit(e) {
    e.preventDefault()
    e.stopPropagation()

    let form = e.target
    let formData = new FormData(form)
    let params = new URLSearchParams(formData)

    // Send request to the server
    fetch('/api/login', {
      method: 'POST',
      body: params
    }).then( (res) => {
      return res.json()
    }).then(data => {
      localStorage.setItem('token', data.token)
      this.setState({loggedin: true})
    }).catch( (err) => {
      console.error(err)
    })
  }

  render() {
    if ( this.state.loggedin ) {
      return (
        <Redirect
          to={{
            pathname: '/',
            state: { from: this.props.location }
          }}
        />
      )
    } else {
      return (
        <div>
          <h1>Login</h1>
          <form onSubmit={this.submit.bind(this)}>
            <div>
              <label>Username: </label>
              <input type="text" name="username" pattern=".{2,16}" required />
            </div>
            <div>
              <label>Password: </label>
              <input type="password" name="password" pattern=".{6,20}" required />
            </div>
            <div>
              <input type="submit" value="Log in" />
            </div>
          </form>
        </div>
      )
    }
  }
}
Front-End Authentication
Once JWT is issued from the server and received by the client, that JWT will be stored in localStorage in our case. We authenticate users on client side by checking whether JWT is stored in the localStorage. Please make isAuthenticated function to do that check.
./src/lib/isAuthenticated.js
// Not a best practice,
// but get the idea
export default function isAuthenticated() {
  return ( localStorage.getItem('token') )
}
Our home page is protected by PrivateRoute, the route that uses this function to see if the user is logged in or not. Please add the following code to the ./src/lib/PrivateRoute.js
./src/lib/PrivateRoute.js
import React from 'react'
import { Redirect, Route } from 'react-router-dom'
import isAuthenticated from './isAuthenticated'

// Router that checks if user is logged-in
// If not, redirect to "/login"
const PrivateRoute = ({ component: Component, ...rest }) => (
  <Route
    {...rest}
    render={props =>
      isAuthenticated() ? (
        <Component {...props} />
      ) : (
        <Redirect
          to={{
            pathname: "/login",
            state: { from: props.location }
          }}
        />
      )
    }
  />
)

export default PrivateRoute
This code above is based on reacttraining.com, so you might want to check that out.
ATTENTION: what we do here is highly dangerous. Our isAuthenticated returns TRUE just because token exists in localStorage. It does not check if it is a valid JWT or it is actually issued by our server-side application. For example, users can type localStorage.setItem('token', true) in the browser console and from then on they can pass PrivateRoute, although they will not be able to get user data from the server. How to securely authenticate users on client side is far beyond the scope of this tutorial. So please understand our application just as an example, not a product. For a bit more on this, please read Further Concerns.
JWT Strategy
Now it is time to implement JWT strategy to our Passport.
Add New Strategy
How you make JWT strategy is almost same as how you made local one. Please add the following code to ./lib/passport-control.js.
./lib/passport-control.js
const passport = ...,
      passportJWT = require("passport-jwt"),
      JWTStrategy = passportJWT.Strategy,
      ExtractJWT = passportJWT.ExtractJwt

// Local Strategy
...

// JWT
passport.use(new JWTStrategy({
  jwtFromRequest: ExtractJWT.fromAuthHeaderAsBearerToken(),
  secretOrKey: 'jwt_secret'
}, (jwt_payload, done) => {
  User.findById(jwt_payload.id).then(user => {
    return done(null, user)
  }).catch(err => {
    return done(err, false, {
      message: 'Token not matched.'
    })
  })
}))

...
One thing to be careful here is that you should define what type of extraction method to use to extract JWT. You can see what type of extraction methods are available at passport-jwt Github repo. As described in their README example I decided to use fromAuthHeaderAsBearerToken. Remember that extracted JWT payload is the data we defined in Issue JWT section. Our JWT strategy eventually obtain user data by using user’s ID and return the data back to the main routing process.
Return Data to Client
The Passport strategy is just to define what the application should do with the given JWT. Hence, we must write the main part of route. Our API entry point to return user data is /api/user. Please add following code to ./routes/index.js.
./routes/index.js
// Return user data
router.get('/user', passport.authenticate('jwt', {
  session: false
}), (req, res) => {
  if ( !req.user ) {
    res.json({
      username: 'nobody'
    })
  }

  res.json({
    username: req.user.username
  })
})
It is a simple route that returns user data passed from our Passport JWT strategy. Note that if you return whole req.user object, that includes user’s ID and hashed passwords, and that’s not what we want to do here. Thus only username is given to the returning object.
Home Page
Our client side home page must do three things: (1) send API request to the server with JWT, (2) retrieve the user data from the server, (3) display that data to the client. This cannot be done easier with React and fetch API:
./src/component/Home.js
import React, { Component } from 'react'

export default class Home extends Component {

  constructor(props) {
    super(props)
    this.state = { user: {} }
  }

  componentDidMount() {
    fetch('/api/user', {
      headers: {
        Authorization: 'Bearer ' + localStorage.getItem('token')
      }
    }).then(res => {
      return res.json()
    }).then(user => {
      this.setState({user: user})
    }).catch( err => {
      console.log(err)
    })
  }

  render() {
    let username = this.state.user.username
    return (
      <div>
        <h1>Home</h1>
        <p>Welcome to Home, {username}.</p>
      </div>
    )
  }
}
See inside fetch() that we set a custom headers value Authorization: 'Bearer ' + localStorage.getItem('token') so that the server can extract JWT with fromAuthHeaderAsBearerToken method we defined above.
Logout
As a last component to be added to our application, let’s create Logout.
import React, { Component } from 'react'
import { Redirect } from 'react-router-dom'

export default class Logout extends Component {
  constructor(props) {
    super(props)

    // Logout process: Remove token from localStorage
    localStorage.removeItem('token')
  }
  render() {
    return (
      <Redirect to="/login" />
    )
  }
}
Because our client side authentication depends on the data in localStorage, you only have to remove token data from there to make the user log out.
Run
Please run the following two commands in the different Terminal windows:
# In one window
$ node server.js
// Or
$ nodemon server.js

# In another window
$ yarn start
The last command will start the Webpack dev server and automatically open the browser guiding you to the localhost:3000.
If you have followed the last tutorial and already have users in the database, try log in. If you have not, go to the Sign up page and make a new user with the username/password combination of jack/secret or jill/birthday.
Your application is running properly if you see Home page saying “Welcome to Home, username.”
Further Concerns
Although there might be infinite number of concerns you are to deal with, here are two of those that you should do for pushing the code to the production level.
Store JWT in Cookie
As mentioned above, our front-end application is vulnerable to the hackers because our JWT is stored in localStorage, wherein user can easily write a new data or overwrite existing data. Ideally speaking, the delicate data such as JWT shall be stored in HTTP only cookie, making it impossible for users to access to that information. This approach, however, is intrusive to some extent. If JWT is stored in cookie, every time users trying to pass the private route, they must send HTTP request to the server to verify the token, by so doing adulterates the usability of client side and whole purpose of Front-end driven application.
The snippet of codes how to extract JWT from cookie is briefly written in passport-jwt NPM page.
Error Handling
Our application is developed as simply as possible—at least to me. In order to provide only the basics, I completely eliminated the codes that handle errors. For example, now our application doesn’t show any message even when a user send a wrong password. It just assumes you send the correct one. In the other scenario, one new user might want to sign up with the username that is already taken. When we try to implement these kind of error handlings, the application would be intricate.
Conclusion
For the last four tutorials, I showed you how to authenticate users with Passport.js in Node application development. As of this writing, the most read article monthly basis on this website is React Authentication App with Lock - Auth0. From this facts I drew an assumption that many people are interested in authentication, looking for the easy way to implement auth program. Also, I thought that authentication is one of challenging tasks for newbie developers. One day on the Issues page of Github repository of my React-Lock codebase, one woman brought up the issue and she suggested to me “Why not Passport.js?” These assumptions and story led me to write this tutorial series.
Personally, I prefer using Passport to Lock; it gives you more flexibility to your application and more joy of developing with it. Always being able to learn new things is one of privileges working in the technology industry.
I hope you learned something helpful with this tutorial and will make a great thing outside world. Thank you for reading.