Authentication with Passport.js - Part 3. Hashing & Remember me
The source code is available on Github. If you found any error in the codes below, please refer to the codes on Github. They shall work properly.
This tutorial is the third of four that show you how to implement and use Node.js authentication middleware Passport.js.
- Basic
- MongoDB & Signup
- Hashing & Remember me
- JWT & React.js
In the previous tutorial, I showed you how to use Passport with MongoDB, along with its modeling middleware Mongoose, storing users’ information in the database and reading it from there. The development of a such application gives you the basic idea of how the application handles data. It, however, still lacks the very important point: security. With the final result of our application in the previous article we store users’ passwords without hashing, which makes the application very insecure.
In this tutorial I’m going to show you how to hash the password at the user’s sign-up and how to verify that hashed password with one that would be input and sent at the log-in. If you are not so familiar with hashing or any computer cryptography, I wrote Basic Encryption & Hashing in Node.js.
I will also show you how to implement the persistent session so that the users don’t have to login again when they close and reopen the browser.
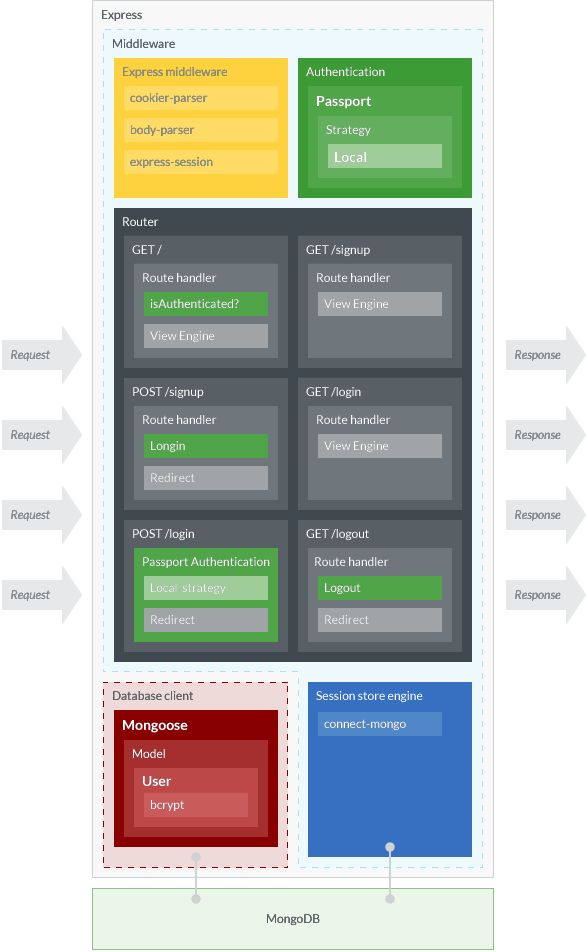
Figure 1 shows the overview of our Express application structure, which is not much different from the previous version. Only difference is that we’re going to use bcrypt to hash and compare passwords, and a session store middleware in order to store session data other than in-memory.
Prerequisites
In order to follow this tutorial, readers must have in his computer:
Inside () are the versions of software that I used for testing. The application is developed very simply, so I believe it is unlikely that errors would happen due to the version difference. Yet, if you encounter any error that cannot be solved easily, please look up the version. Also, by the time of your reading, NPM packages might be updated to the next version. In which case, please check out their official documentation to apply the code below. The versions of NPM packages are found in package.json on Github.
If you don’t have Yarn, please replace yarn with corresponding npm command.
Preparation
In this section, I assume that readers use Apple’s computers. Sorry for windows or linux users. If you are not a Mac user, please proceed with the corresponding operations based on your operating system.
Before diving into how to make an application, let us prepare what we need for the development: database, modules, and files. While you are following this tutorial, please open two Terminal windows or tabs; one is for MongoDB daemon and another for the application.
Database
If you have followed the previous tutorial…
If you already have followed the previous tutorial—besides I gratefully thank you—you must delete all the users’ data that you might have created in the test run. Assuming that you use the database named passport–if you use other than that name don’t forget to replace the name of the database—please boot up MongoDB daemon in one Terminal window and run the following commands in the another:
# In one Terminal
$ mongod --config /usr/local/etc/mongod.conf

# In the another
$ mongo
> use passport;
> db.users.deleteMany({});
> db.users.find() # Must return nothing
> exit;
Just keep running MongoDB daemon while you’re following this tutorial, and please move on to Modules
If you haven’t followed the previous tutorial…
Please refer to Preparation — Database in the previous article.
Modules
Before installing NPM modules, let’s make your application directory:
$ mkdir passport-example # Skipped this if you’ve don the previous tutorial
$ mkdir passport-example/03-hashing-remember
$ cd passport-example/03-hashing-remember
After creating the root directory and move your working directory to there, please execute:
$ yarn init
$ yarn add passport passport-local
$ yarn add express body-parser cookie-parser express-session connect-flash
$ yarn add mongoose connect-mongo
$ yarn add pug
$ yarn add bcrypt
We just installed packages separately at three times based on their purposes, but of course you can just install them with one command. As you can see, we use Pug as our view engine.
If you haven’t used bcrypt before on your computer, you might have a trouble installing the module. If that’s the case, please check out bcrypt - npm and follow its installation guideline.
Files
The file structure of this application is as follows:
.
├─ db
│  └─ User.js
├─ lib
│  └─ passport-control.js
├─ node_modules
├─ public
├─ routes
│  └─ index.js
├─ server.js
└─ views
   ├─ index.pug
   ├─ layout.pug
   ├─ login.pug
   └─ signup.pug
There is no new file since the previous version, so just copy and paste all necessary files from the previous application directory if you followed the previous tutorial. If you haven’t, please refer to the Preparation – File in the previous article, and copy and paste the codes of lib/passport-controljs and routes/index.js from Github.
Now we’re going to update files to enable hashing and persistent session.
Hashing
In order to make the hashed password authentication possible, you must add two functionalities. One is to hash a password at the user’s sing-up. The second is to compare and verify the hashed password with the one which is given at the user’s login.
Hash Password
There are many ways to achieve hashing a password then store it in the database. In this tutorial, we’re going to use Mongoose’s Schema.prototype.pre() API. With this API you can hook a certain action to the certain method. We’re going to add a hook of event that hashes an input password to the save method. Let’s update our ./db/User.js as follows so that we can hash a password before we save it to the database.
./db/User.js
const mongoose = require('mongoose'),
      bcrypt = require('bcrypt')

var userSchema = new mongoose.Schema({
  …
})

// Hash password before saving
userSchema.pre('save', function(next) {
  var user = this

  if ( !user.isModified('password') ) return next()

  bcrypt.hash(user.password, 10, (err, hash) => {
    if (err) {
      return next(err)
    }
    user.password = hash
    next()
  })
})

…
When I wrote the code above in the ES6 syntax, somehow the code didn’t work properly. Hence only in ./db/User.js I followed the ES5 syntax.
One thing to note here is that we want to hash a password only when it is modified or newly created. If we don’t do that we would end up hashing the hashed password every time when the user’s information is updated. See if ( !user.isModified('password') ) condition.
We just set up saltRounds at 10.
Compare Passwords
Now we shall compare the hashed password with the plain password that a user sends at the login. This is little bit more difficult than simply hashing a password.
To make things simple, we’ll add an instance method called login to our userSchema.methods object. I believe some developers would have contempt for this kind of approach. I do understand that you don’t want to extend the external library because which causes future vulnerability due to the version update. The worst scenario you can imagine is that Mongoose adds the login method to the Schema object by default. Nevertheless, I thought that the benefit of putting every thing related to user model inside one file outweighs the drawback of separating the logics. So I decided to extend Schema.methods. Please add the following code to /db/User.js:
./db/User.js
const mongoose = require('mongoose'),
      bcrypt = require('bcrypt')

var userSchema = new mongoose.Schema({
  …
})

userSchema.pre('save', function(next) {
  …
})

userSchema.methods.login = function(password) {
  var user = this
  return new Promise((resolve, reject) => {
    bcrypt.compare(password, user.password, (err, result) => {
      if ( err ) { reject(err) }
      resolve()
    })
  })
}

…
As you can see, our login method is a function that returns a Promise instance that resolves at the fulfillment of two passwords, hashed and plain, are matched—I’m not sure match is the proper term. For some applications, the comparison program of two passwords is written inside the router file. But by following the approach above, your router will be able to focus more on routing, user model on user handling.
If you are not familiar with Promise, I encourage you to read MDN’s documentation.
Now the last thing we should do for hash authentication is to use userSchema inside our Passport’s local strategy. Please update the local strategy in ./lib/passpot-control as follows:
./lib/passport-control
passport.use(new Strategy( (username, password, done) => {
  User.findOne({username: username}, (err, user) => {

    // If any error
    if (err) { return done(err) }

   // If no user found
    if (!user) {
      return done(null, false, {
        message: 'No user found.'
      })
    }

    user.login(password).then(() => {
       return done(null, user)
    }).catch((err) => {
      return done(err, false, {
        message: 'Password not matched.'
      })
    })
  })
}))

…
Because of our new user model method login, the only difference from the previous version is that two of returning callbacks done() are wrapped in the resolver and rejection handlers.
Remember me
“Do you remember?”
sings the k-pop idle Apink. Aside jokes, without remember-me functionality our web experience would be much more irritating.
Our previous version of application stores session data in memory. Which means that those data will disappear when users close their browsers or when the application reboots. To push the application one step further to the production level, we are going to implement persistent session.
The first thing you should is to decide wherein you store session data. As of this writing, it seems that most of Node developers choose to use Redis as their session store. Despite of the fact that Redis session store package connect-redis is currently stared over twenty hundreds on Github, we will use MongoDB as session store in this tutorial, just because it would be more works to install Redis on your computer. We use connect-mongo to store session in MongoDB.
Generally speaking, Redis is faster than MongoDB because of in-memory based data mechanism, whereas with MongoDB you write data in file system. Although there is such an downside for the MongoDB, connect-mongo is stared around sixteen hundreds on Github, secondly stared following connect-redis, leaving other session store packages far behind. Therefore, if you don’t want to use Redis, MongoDB is your option, and still does good jobs.
To store session data in MongoDB, we must pass session store object to the store field of express-session’s option. Please update your server.js as follows:
./server.js
…

const cookieParser = require('cookie-parser'),
      …
      MongoStore = require('connect-mongo')(session)

…
app.use(session({
  secret: 'cats',
  resave: false,
  saveUninitialized: false,
  store: new MongoStore({ mongooseConnection: mongoose.connection })
}))
…
Easy peasy. From now on our application will store session data in MongoDB.
Set up MaxAge
Changing the store is sufficient for persistent session, but we will move further. For now cookie we issue, which contains session information, is not defined max age or expiration date. What if we want to set up those information to cookie, making users forcibly logout and re-login regularly bases, improving the security of whole application.
To set up the max age of cookie, we’ll modify the POST /login router. Please add a new middleware to our router.post('/login') like this:
./routes/index.js
router.post('/login', passport.authenticate('local', {
  // successRedirect: '/',
  failureRedirect: '/login',
  failureFlash: true
}), (req, res) => {
  if ( req.body.remember ) {
    req.session.cookie.originalMaxAge = 24 * 60 * 60 * 1000 // Expires in 1 day
  } else {
    req.session.cookie.expires = false
  }
  res.redirect('/')
})
As an example, we set the max age at 1 day—technically 24 hours. I will not cover how to issue cookie with max age at the sign-up; it is basically the same, so I believe you can do it on your own.
Let’s not forget to add a new checkbox to the login form.
./views/login.pug
…
    div
      label
        input(type="checkbox", name="remember")
        |  Keep me logged-in for 1 day
    …
Run
The final result of each file we modified in this tutorial will look something below:
./db/User.js
const mongoose = require('mongoose'),
      bcrypt = require('bcrypt')

// Mongoose Model
var userSchema = new mongoose.Schema({
  username: {
    type: String,
    index: true,
    unique: true,
    minlength: 2,
    maxlength: 16,
    lowercase: true,
    required: true,

  },
  password: {
    type: String,
    required: true,
  }
})

// Hash password before saving
userSchema.pre('save', function(next) {
  var user = this

  if ( !user.isModified('password') ) return next()

  bcrypt.hash(user.password, 10, (err, hash) => {
    if (err) {
      return next(err)
    }
    user.password = hash
    next()
  })
})

// Password verification
userSchema.methods.login = function(password) {
  var user = this
  return new Promise((resolve, reject) => {
    bcrypt.compare(password, user.password, (err, result) => {
      if ( err ) { reject(err) }
      resolve()
    })
  })
}

// Export Mongoose "User" model
module.exports = mongoose.model('User', userSchema)
./lib/passport-control.js
const passport = require('passport'),
      Strategy = require('passport-local').Strategy,
      User = require('../db/User')

// Local Strategy
passport.use(new Strategy( (username, password, done) => {
  User.findOne({username: username}, (err, user) => {

    // If any error
    if (err) { return done(err) }

   // If no user found
    if (!user) {
      return done(null, false, {
        message: 'No user found.'
      })
    }

    user.login(password).then(() => {
       return done(null, user)
    }).catch((err) => {
      return done(err, false, {
        message: 'Password not matched.'
      })
    })
  })
}))

// Session
passport.serializeUser( (user, done) => done(null, user.id) )
passport.deserializeUser( (id, done) => {
  User.findById(id, (err, user) => {
    if (err) { return done(err) }
    done(null, user)
  })
})

module.exports = passport
./server.js
// Common modules
const path = require('path')

// MongoDB
const mongoose = require('mongoose')
mongoose.connect('mongodb://localhost:27017/passport', {useNewUrlParser: true, useCreateIndex: true})

// Initializing Express
const express = require('express'),
      app = express(),
      port = 3000

// Middlewares
const cookieParser = require('cookie-parser'),
      session = require('express-session'),
      bodyParser = require('body-parser'),
      flash = require('connect-flash'),
      MongoStore = require('connect-mongo')(session),
      passportControl = require('./lib/passport-control')

app.use(cookieParser())
app.use(session({
  secret: 'cats',
  resave: false,
  saveUninitialized: false,
  store: new MongoStore({ mongooseConnection: mongoose.connection })
}))
app.use(bodyParser.urlencoded({ extended: false }))
app.use(flash())
app.use(express.static(path.join(__dirname, 'public')))
app.use(passportControl.initialize())
app.use(passportControl.session())

// View engine
app.set('views', path.join(__dirname, 'views'))
app.set('view engine', 'pug')

// Routers
app.use('/', require('./routes'))

// Run server
app.listen(port, () => console.log(`Example app listening on port ${port}!`))
./routes/index.js
const express = require('express'),
      passport = require('passport'),
      User = require('../db/User'),
      router = express.Router()

/* Home */
router.get('/', (req, res) => {

  if ( !req.isAuthenticated() ) { res.redirect('/login') }

  res.render('index', {
    title: 'Home',
    user: req.user
  })
})

/* Signup */
router.get('/signup', (req, res) => {
  res.render('signup', { title: 'Signup' })
})

router.post('/signup', (req, res) => {
  var user = new User({
    username: req.body.username,
    password: req.body.password
  })

  user.save().then(() => {
    req.login(user, (err) => {
      if (err) {
        res.redirect('/signup')
      }
      res.redirect('/')
    })
  }).catch((err) => {
    res.redirect('/signup')
  })
})

/* Login */
router.get('/login', (req, res) => {
  res.render('login', { title: 'Login' })
})

router.post('/login', passport.authenticate('local', {
  // successRedirect: '/',
  failureRedirect: '/login',
  failureFlash: true
}), (req, res) => {
  if ( req.body.remember ) {
    req.session.cookie.originalMaxAge = 24 * 60 * 60 * 1000 // Expires in 1 day
  } else {
    req.session.cookie.expires = false
  }
  res.redirect('/')
})

/* Logout */
router.get('/logout', (req, res) => {
  req.logout()
  res.redirect('/login')
})

module.exports = router
./views/login.pug
extends layout

block content
  h1= title
  form(action="/login", method="post")
    div
      label Username:
      input(type="text", name="username", pattern=".{2,16}", required)
    div
      label Password:
      input(type="password", name="password", pattern=".{6,20}", required)
    div
      label
        input(type="checkbox", name="remember")
        |  Keep me logged-in for 1 day
    div
      input(type="submit", value="Log in")
After checking the files, please run the application with the following command:
$ node server.js
# Or with Nodemon
$ nodemon server.js
The application will be running at localhost:3000, redirecting you to the login page.
You might want to open the application with the another browser; we’ll close the browser to test persistent session.
Since we deleted the all users information, please sign up your application first. It will store the hashed password. If you don’t bother to come up with the username and password, just use the username/password combination of jack/secret or jill/birthday from the previous tutorials. Having done the signing up, let’s log out once and re-login with your plain password, checking the “Keep me logged-in for 1 day” checkbox. If you successfully logged in, please close the browser, re-open it, visitlocalhost:3000 again. If your cookie and session are preserved, this time you won’t be redirected.
Next
In this and preceding two tutorials, so far I showed you how to implement Passport authentication to the Express application, bringing up to the practical production level. To this point your application performs sufficient authentication to protect some pages restricted to certain users—only if the application is server-side driven.
As more and more applications rely on client-side computation, to finish off this series of Passport tutorials, in the next article I’m going to show you how to make client-side React application that authenticates users with Passport and JSON Web Tokens(JWT), sending Ajax request.