Authentication with Passport.js - Part 2. MongoDB & Sign-up
The source code is available on Github. If you found any error in the codes below, please refer to the codes on Github. They shall work properly.
This tutorial is the second of four that show you how to implement and use Node.js authentication middleware Passport.js.
- Basic
- MongoDB & Signup
- Hashing & Remember me
- JWT & React.js
In the previous tutorial, I showed you how to use Passport, what authentication is, and the concept of session and cookie. In this tutorial, I’m going to show you what lacks in the previous one: loading data from database and letting users sign up your application. In the part one, I used pseudo database in which users’ information is written in the form of JavaScript file. This approach is very helpful only when the whole point of tutorial is to give you the idea and usage of Passport. It is, however, nothing practical.
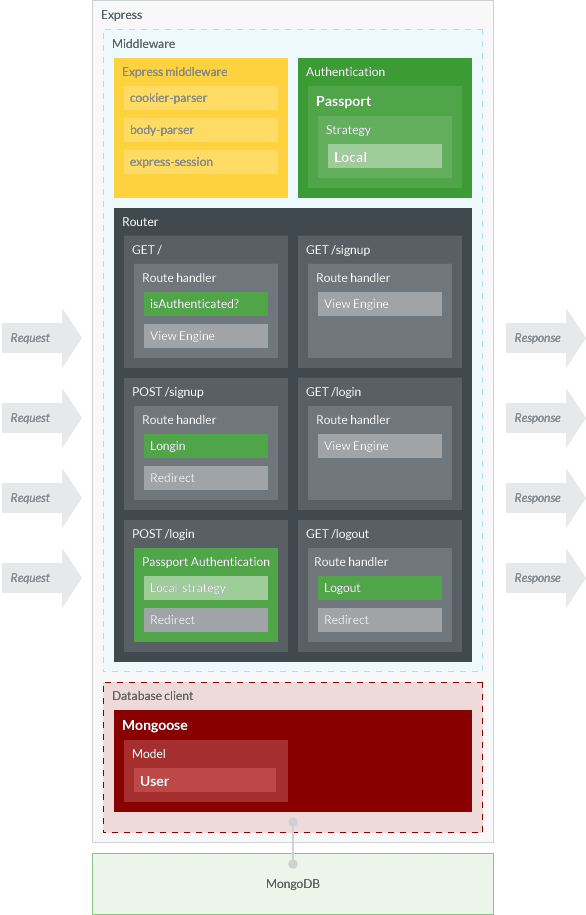
Figure 1 shows the rough structure of our Express application. This time, we’re going to make an application that can communicate with MongoDB, storing and reading the data to and from it, with the support of MongoDB modeling module Mongoose. By doing that, we will also upgrade our application so that users can sign up our application through browsers, and then get authenticated at their sign-up. One thing that will be neglected is how to update user information, which is, I believe, more than the scope of authentication.
Prerequisites
In order to follow this tutorial, readers must have in his computer:
Inside () are the versions of software that I used for testing. The application is developed very simply, so I believe it is unlikely that errors would happen due to the version difference. Yet, if you encounter any error that cannot be solved easily, please look up the version. Also, by the time of your reading, NPM packages might be updated to the next version. In which case, please check out their official documentation to apply the code below. The versions of NPM packages are found in package.json on Github.
If you don’t have Yarn, please replace yarn with corresponding npm command.
Preparation
In this section, I assume that readers use Apple’s computers. Sorry for windows or linux users. If you are non Mac user, please proceed with the corresponding operations based on your situation.
Before diving into how to make an application, let us prepare what we need for the development: database, modules, and files. While you are following this tutorial, please open two Terminal windows or tabs; one is for MongoDB daemon and another for the application.
Database
If you don’t have MongoDB in your computer yet, please download it from here, or if you have Homebrew installed, you can simply install MongoDB by:
$ brew tap mongodb/brew
$ brew install mongodb-community@4.0
Having installed MongoDB, please run the next command in one of two Terminal windows:
$ mongod --config /usr/local/etc/mongod.confI’ve tried brew services start mongodb-community@4.0 for running MongoDB as its document says, but somehow it didn’t work. It seems the same thing happens to other people and you need further configuration to make that command work. Please check out Stack Overflow on that.
Now in one Terminal window your MongoDB daemon is running. Please guide you to another window and connect to a Mongo shell by:
$ mongoNow in the Mongo shell please run:
> use passport;
> db.foo.insert({foo: 'bar'});
> db.foo.find();
# This will return something like
# { "_id" : ObjectId("x"), "foo" : "bar" }
> exit;
The command above assumes that you want to make a database called passport. If you want to use a database name other than that, feel free to replace the name. Just don’t forget to replace the database name string in the code below.
Simply running use passport doesn’t create a new database. So you need to insert a dummy document to it.
Modules
Before installing NPM modules, let’s make your application directory:
$ mkdir passport-example # Skipped this if you’ve don the previous tutorial
$ mkdir passport-example/02-mongo-signup
$ cd passport-example/02-mongo-signup
After creating the root directory and move your working directory to there, please execute:
$ yarn init
$ yarn add passport passport-local
$ yarn add express body-parser cookie-parser express-session connect-flash
$ yarn add mongoose
$ yarn add pug
We just installed packages separately at three times based on their purposes, but of course you can just install them with one command. As you can see, we use Pug as our view engine.
Files
The file structure of this application is as follows:
.
├─ db
│  └─ User.js
├─ lib
│  └─ passport-control.js
├─ node_modules
├─ public
├─ routes
│  └─ index.js
├─ server.js
└─ views
   ├─ index.pug
   ├─ layout.pug
   ├─ login.pug
   └─ signup.pug
We are going to make our original Passport module called passport-control, but more on that later.
You can create each file when we need them, but to reduce vexation of later moment, let’s create all files at this point. Please create all files with the following commands:
$ mkdir db lib routes views
$ touch db/User.js lib/passport-control.js routes/index.js server.js
$ cd views
$ touch index.pug layout.pug login.pug signup.pug
$ cd ../
After that, keep adding the following codes to each file.
./db/Users.js
const mongoose = require('mongoose')

// Mongoose Model
const userSchema = new mongoose.Schema({
  username: {
    type: String,
    index: true,
    unique: true,
    minlength: 2,
    maxlength: 16,
    lowercase: true,
    required: true,

  },
  password: {
    type: String,
    required: true,
  }
})

// Export Mongoose "User" model
module.exports = mongoose.model('User', userSchema)
./views/layout.pug
doctype html
html
  head
    title= title
  body
    nav
      ul(style="display: flex;list-style:none;")
        li(style="margin: 0 1em;")
          a(href="/") Home
        unless user
          li(style="margin: 0 1em;")
            a(href="/signup") Singup
        unless user
          li(style="margin: 0 1em;")
            a(href="/login") Login
        if user
          li(style="margin: 0 1em;")
            a(href="/logout") Logout
    block content
The codes of two files below, index.pug and login.pug are no different from the previous tutorial. You might want to copy them if you’ve followed it.
./views/index.pug
extends layout

block content
  h1= title
  p Welcome to #{title}, #{user.username}!
./views/login.pug
extends layout

block content
  h1= title
  form(action="/login", method="post")
    div
      label Username:
      input(type="text", name="username", required)
    div
      label Password:
      input(type="password", name="password", required)
    div
      input(type="submit", value="Log in")
./views/signup.pug
extends layout

block content
  h1= title
  form(action="/signup", method="post")
    div
      label Username:
      input(type="text", name="username", required)
    div
      label Password:
      input(type="password", name="password", required)
    div
      input(type="submit", value="Sign up")
./routes/index.js
const express = require('express'),
      passport = require('passport'),
      User = require('../db/User'),
      router = express.Router()

/* Home */
router.get('/', (req, res) => {

  // Check if a user is logged-in, is authenticated
  if ( !req.isAuthenticated() ) {
    res.redirect('/login')
    return
  }

  res.render('index', {
    title: 'Home',
    user: req.user
  })
})

/* Signup */
router.get('/signup', (req, res) => {
  res.render('signup', { title: 'Signup' })
})

router.post('/signup', (req, res) => {
  // Codes will come here
})

/* Login */
router.get('/login', (req, res) => {

  // If any error
  console.log(req.flash('error'))

  res.render('login', { title: 'Login' })
})

router.post('/login', passport.authenticate('local', {
  successRedirect: '/',
  failureRedirect: '/login',
  failureFlash: true
}))

/* Logout */
router.get('/logout', (req, res) => {
  req.logout()
  res.redirect('/login')
})

module.exports = router
And lastly:
./server.js
// Common modules
const path = require('path')

// MongoDB
const mongoose = require('mongoose')
mongoose.connect('mongodb://localhost:27017/passport', {
  useNewUrlParser: true,
  useCreateIndex: true
})

// Initializing Express
const express = require('express'),
      app = express(),
      port = 3000

// Middlewares
const cookieParser = require('cookie-parser'),
      session = require('express-session'),
      bodyParser = require('body-parser'),
      flash = require('connect-flash'),
      passportControl = require('./lib/passport-control')

app.use(cookieParser())
app.use(session({ secret: 'cats', resave: false, saveUninitialized: false }))
app.use(bodyParser.urlencoded({ extended: false }))
app.use(flash())
app.use(express.static(path.join(__dirname, 'public')))
app.use(passportControl.initialize())
app.use(passportControl.session())

// View engine
app.set('views', path.join(__dirname, 'views'))
app.set('view engine', 'pug')

// Routers
app.use('/', require('./routes'))

// Run server
app.listen(port, () => console.log(`Example app listening on port ${port}!`))
If you use the database name other than passport, please don’t forget to update mongodb://localhost:27017/passport.
Passport Control
This approach is my own idea, thus, some developers might find it very strange or absurd. Yet I decided to do it. What I wanted to do is to separate the Passport functionality away from core Express, so that the application will be more maintainable and more modular. And I named this module passport-control, just like at the airport the passport control checks your passport and identity. In passport-control, you define your strategy, how to serialize a user, and more if you wish. It wraps your User model that might have to require your unique specification for your distinct awesome efficient application in future, and that is what differentiates it from Passport.
The main—and only—difference between the Passport code in the previous tutorial and in this tutorial is that now we can rely on Mongoose to communicate with database, which makes it even easier to write a code. we use Model.findOne() API to find a user that matches to the usernamevalue sent from the client. Our passport-control.js will look like as follows:
./lib/passport-control.js
const passport = require('passport'),
      Strategy = require('passport-local').Strategy,
      User = require('../db/User')

// Local Strategy
passport.use(new Strategy( (username, password, done) => {
  User.findOne({username: username}, (err, user) => {

    // If any error
    if (err) { return done(err) }

    // If no user found
    if (!user) {
      return done(null, false, {
        message: 'No user found.'
      })
    }

    // Password not matched
    if (user.password != password) {
      return done(null, false, {
        message: 'Password not matched.'
      })
    }

    return done(null, user)
  })
}))

// Session
passport.serializeUser( (user, done) => done(null, user.id) )
passport.deserializeUser( (id, done) => {
  User.findById(id, (err, user) => {
    if (err) { return done(err) }
    done(null, user)
  })
})

module.exports = passport
See that db.users.findByUsername(), which is defined manually in ./db/users.js in the previous tutorial, is now updated to Mongoose’s User.findOne().
I won’t explain what passport.serializeUser() and passport.deserializeUser() are. If you want to know about it, please check out the previous tutorial or Passport’s documentation.
Sign Up
The next and last thing we should do is to add a code to route.post('/signup'), and there are two sub things to do so: (1) store user information to MongoDB, and (2) let the new user login—or in other words let him get authenticated—at his sing-up. In order to do that we are going to use Mongoose’sModel.prototype.save() API and Passport’s login function. Please updated route.post('/signup') as follows:
router.post('/signup', (req, res) => {
  let user = new User({
    username: req.body.username,
    password:req.body.password
  })

  user.save().then(() => {
    req.login(user, (err) => {
      if (err) { res.redirect('/signup') }
      res.redirect('/')
    })
  }).catch((err) => {
    res.redirect('/signup')
  })
})
That’s it.
Run
Now it is time to run our application. Please execute the following command to run the app:
$ node server.js
# Or with Nodemon
$ nodemon server.js
Please visit localhost:3000—it will redirect you to the login page—and go to the Signup from the global navigation, then fulfill the sign-up form and submit it. Note that your username must be at least 2 letters long, as it is defined in ./db/User.js. If you don’t bother to come up with the username and password, just use the username/password combination of jack/secret or jill/birthday from the previous tutorial. If your sign-up went successfully, you will see the home page saying “Welcome to Home, username.”
Once signed up, please try to logout and see whether you can login with the information you just signed up with.
Check User Information from Mongo Shell
If you’d like to see the information of users from Mongo shell, please run the following commands:
$ mongo
# It opens a Mongo shell
> use passport;
> db.users.find();
This will show you the all users’ data.
Next
You must never store users’ password in a raw format; you must always store them hashed. In the next tutorial, I’m going to show you how to hash users’ passwords at their sign-up, and compare and verify its hashed passwords with the input ones at their log-in using Node bcript module.
In addition to that, I will also introduce you to Remember me persistent session. For now, our application stores session data in memory. Which means that once users closes browsers or the application restarts, all session data will disappear. To prevent this happens, we going to make a bit of tweak on route.post('/login') to set up the max age for cookie we issue. Thank you for reading this tutorial.