Authentication with Passport.js - Part 1. Basic
The source code is available on Github. If you found any error in the codes below, please refer to the codes on Github. They shall work properly.
This is the first of four tutorials that show you how to implement and use Node.js authentication middleware Passport.js.
Most of web applications come with authentication. And for most of learning developers, that is the first challenge they face—send request from the client side, process the request’s body, load data from database, respond with proper information redirecting a user or showing proper error message. In short, inside authentication lies the foundation of web application development.
In this tutorial I’m going to show you how to authenticate a user with username/password combination using Passport.js, Node.js middleware that handles authentication. Although passport.js is very easy to extend itself to implement Oauth, this tutorial focuses on the very basic most common authentication: Username and Password, in conjunction with the passport-local strategy module distributed by Jared Hanson, who is a main contributor of Passport’s strategies.
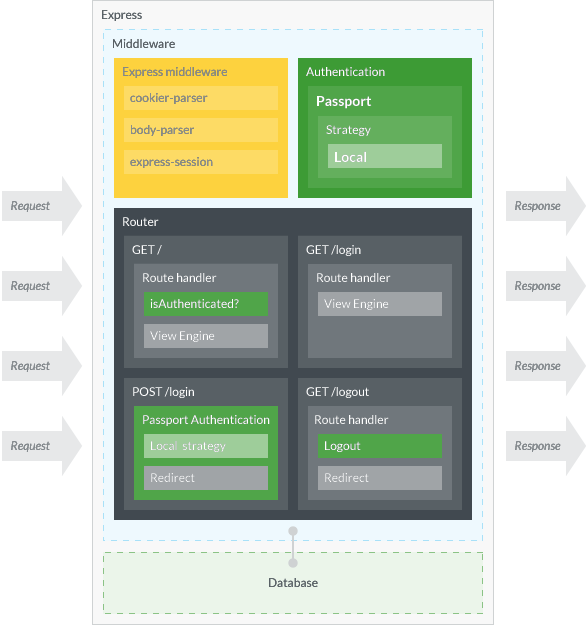
Figure 1 shows the rough structure of application we are going to make. We use Express.js as an application framework, along with its common middleware modules like cookie-parser, body-parser, and express session to make authentication possible. In addition to these, we implement Passport as an authentication layer. The middleware and functions colored in green are the ones related to Passport. Usually, web application and database are independent applications, only connected through database client. But for simplicity, we are going to write minimum database program and use it as a part of Express application.
The application has three pages and one API entry point: (1) home page which requires authentication, (2) login page, (3) logout page which is virtually invisible to users, and (4) API entry point which deals with login POST request.
Please note that the figure depicts only things regarding this tutorial. The actual application must be much more sophisticated than that—in fact even I don’t understand it.
What is Authentication
If you know what authentication is, please jump to Prerequisites.
Simply put, authentication is to verify whether one user is actually a man who he says he is, or more broadly sense, to check if he is telling the truth or not.
(Here, saying “a man” has nothing to do with sexism. I might have to say “a man or woman.” Nevertheless, I prefer to use just “a man” because it is simpler and it makes, I think, a sentence more understandable. If you are a female readers, please don’t be offended. I use “a man” for saying of anonymous person just because I am a man.)
For the similar meaning, there is another term authorization. Authorization means to give one person an authority or a right to do something. You might have seen the spy movie in which a hero tries to enter a secure room but at first attempt he gets “unauthorized.” In web application, authentication is like a process of authorization: give one user a right to access restricted pages. Nevertheless, we web developers use two terms in different ways.
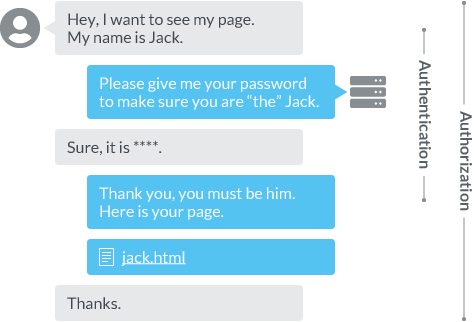
Figure 2. shows the ideas of authentication and authorization. We use authentication when we identify a user, and authorization when we give a user further permissions to do something more restricted. One way to look at it is that authentication is a part of authorization, although most of time authentication is done before authorization, and either processes are done once and won’t be done for certain amount of time.
For instance, Netflix authorizes only a premium user to watch movies in ultra HD quality. In authentication process a user inputs and sends username/password, whereas in authorization the process is done by reading the information like plan from the database leaving him do nothing yet enjoy everything—except the time when they upgrade and pay their ass.
Prerequisites
In order to follow this tutorial, readers must have…
Inside () are the versions of software that I used for testing. The application is developed very simply, so I believe it is unlikely that errors would happen due to the version difference. Yet, if you encounter any error that cannot be solved easily, please look up the version. Also, by the time of your reading, NPM packages might be updated to the next version. In which case, please check out their official documentation to apply the code below. The versions of NPM packages are found in package.json on Github.
If you don’t have Yarn, please replace yarn with corresponding npm command. Plus, it is not a requisite but readers are recommended to understand the basic logic of HTTP and the development of Express beforehand.
Install Modules & Create Files
To get started, first let’s create our application root directory. Please run the next command in your Terminal.
$ mkdir passport-example
$ mkdir passport-example/01-basic
$ cd passport-example/01-basic
Install Modules
After creating the root directory and move your working directory to there, please execute:
$ yarn init # answer the questions
$ yarn add passport passport-local
$ yarn add express body-parser cookie-parser express-session
$ yarn add pug
We just installed packages separately at three times based on their purposes, but of course you can just install them at once. We use Pug as our view engine. There will be one more module to be installed but I will cover that later.
Create Files
The structure of this application is as follows:
.
├── db
│   ├── index.js
│   └── users.js
├── public
├── server.js
└── views
    ├── index.pug
    ├── layout.pug
    └── login.pug
You can create each file when we need them, but to reduce vexation of later moment, let’s create all files at this point. Please create all files with the following commands:
$ mkdir db public views
$ touch db/index.js db/users.js
$ touch server.js
$ touch views/index.pug views/layout.pug views/login.pug
After that, please keep adding the following codes to each file.
./db/index.js
exports.users = require('./users');
./db/users.js
var records = [
  { id: 1, username: 'jack', password: 'secret', displayName: 'Jack', emails: [ { value: 'jack@example.com' } ] },
  { id: 2, username: 'jill', password: 'birthday', displayName: 'Jill', emails: [ { value: 'jill@example.com' } ] }
];

exports.findById = function(id, cb) {
  process.nextTick(function() {
    var idx = id - 1;
    if (records[idx]) {
      cb(null, records[idx]);
    } else {
      cb(new Error('User ' + id + ' does not exist'));
    }
  });
}

exports.findByUsername = function(username, cb) {
  process.nextTick(function() {
    for (var i = 0, len = records.length; i < len; i++) {
      var record = records[i];
      if (record.username === username) {
        return cb(null, record);
      }
    }
    return cb(null, null);
  });
}
The codes of two files above are copied from express-4.x-local-example.
./views/layout.pug
doctype html
html
  head
    title= title
  body
    nav
      ul(style="display: flex;list-style:none;")
        li(style="margin: 0 1em;")
          a(href="/") Home
        li(style="margin: 0 1em;")
          a(href="/login") Login
        li(style="margin: 0 1em;")
          a(href="/logout") Logout
    block content
./views/index.pug
extends layout

block content
  h1= title
  p Welcome to #{title}, #{user.username}!
./views/login.pug
extends layout

block content
  h1= title
  form(action="/login", method="post")
    div
      label Username:
      input(type="text", name="username", required)
    div
      label Password:
      input(type="password", name="password", required)
    div
      input(type="submit", value="Log in")
Now it is time to write our main application to server.js.
Core Server
The rest of codes below go to ./server.js. Before implementing authentication logic to our application, let’s first create a basic server that serves static pages.
// Common modules
const path = require('path')

// Initializing Express
const express = require('express'),
      app = express(),
      port = 3000

// Middlewares
const cookieParser = require('cookie-parser'),
      session = require('express-session'),
      bodyParser = require('body-parser')

app.use(cookieParser())
app.use(session({ secret: 'cats', resave: false, saveUninitialized: false }))
app.use(bodyParser.urlencoded({ extended: false }))
app.use(express.static(path.join(__dirname, 'public')))

// View engine
app.set('views', path.join(__dirname, 'views'))
app.set('view engine', 'pug')

// Database
const db = require('./db')

// Routers
app.get('/', (req, res) => {
  res.render('index', {
    title: 'Home',
    user: {
      username: 'Jack'
    }
  })
})

app.get('/login', (req, res) => {
  res.render('login', { title: 'Login' })
})

app.get('/logout', (req, res) => {
  res.redirect('/login')
})

// Run server
app.listen(port, () => console.log(`Example app listening on port ${port}!`))
As simple as it is, this is a server that has three pages—with one that redirects a user to the /login page that is not visible to him—can handle sessions and cookies, and accepts request’s body—since a user must have to send username and password via HTTP. Upon this logics stands our authentication. Please check if your server can run properly by:
$ node server.js
# Or, with Nodemon
$ nodemon server.jsPassport’s Strategy
What is “strategy?” You might ask. It is simply a mechanism how to authenticate a user. In this case, the strategy is to check whether the input password matches to the one of given user’s. And this strategy is called, from Passport community, “local.”
Now let’s import Passport modules to our application, define the local strategy, and add it as a middleware:
// Passport
const passport = require('passport'),
      Strategy = require('passport-local').Strategy

passport.use(new Strategy( (username, password, done) => {
  db.users.findByUsername(username, (err, user) => {
    if (err) { return done(err) }
    if (!user) { return done(null, false) }
    if (user.password != password) { return done(null, false) }
    return done(null, user)
  })
}))

app.use(passport.initialize())
Our local strategy, just like most of local strategies out there, does something as follows:
- Find a user from the database whose username matches the input one.
- If there is any error or couldn’t find a user, it bypasses an error or null.
- Check if the found user’s password matches with the one input.
- If it matches, it bypasses the user information.
The router to which this strategy must be applied is app.post('/login'). Let’s add that router to our application so that our strategy will be applied as an authentication.
app.post('/login', passport.authenticate('local', {
  successRedirect: '/',
  failureRedirect: '/login',
  failureFlash: true
}))
The passport.authenticate() is a function to call our local strategy that we just defined. We can tell the function what strategy is to be used simply by passing string “local”. The second argument is an option object what to do at the success or failure of authentication. In our case, the application redirects a user to the home page at the success, and to the login page at the failure—or to the user it feels like refreshing the page. The last value of option failureFlash defines whether Passport should flash the error message at the authentication failure.
The concept of flash is (almost) completely ignored by Passport’s official documentation. It simply says “Setting the failureFlash option to true instructs Passport to flash an error message using the message option set by the verify callback above. This is helpful when prompting the user to try again.
” It does not state anything about how to show the message, which shall be cover in the next sub section.
There is one more thing to be covered: session. For now our application does not yet know how to establish a session with a user. This will be covered in the subsequent sub section.
Flash
“The flash is a special area of the session used for storing messages. Messages are written to the flash and cleared after being displayed to the user,”
says Jared Hanson on connect-flash Github page, who is also the author of passport-local. After Express 3.x it removed the direct support for the flash. Thus, we need to manually install it. Let’s install connect-flash to our project.
$ yarn add connect-flashAfter installation, please write a code to use connect-flash as a middleware.
// Other middlewares
…
const flash = require('connect-flash')
app.use(flash())
In order to pass the flash message from Passport to the router, please update server.js as follows:
// Strategy
passport.use(new Strategy( (username, password, done) => {
  db.users.findByUsername(username, (err, user) => {

    // If any error
    if (err) { return done(err) }

    // If no user found
    if (!user) {
      return done(null, false, {
        message: 'No user found.'
      })
    }

    // Password not matched
    if (user.password != password) {
      return done(null, false, {
        message: 'Password not matched.'
      })
    }

    return done(null, user)
  })
}))

…

// "GET /login" router
app.get('/login', (req, res) => {

  // If any error
  console.log(req.flash('error'))

  res.render('login', { title: 'Login' })
})
The code above is an example, just log the flash message on your Terminal, only the administrator can see it. For the product application you must pass the message to the view engine and show it to a user. But for the sake of simplicity, I just show you how to set and pass the flash with Passport.
Session
Session in computer science, if I use a childish description, is an internet connection between one server and one user. (It doesn’t have to be one user, it can be many.)
When you deal with session in web development, usually it comes with cookie, another jargon in computer science that sounds yummy but is actually far away from it. Cookie is a piece of information sent from a user as part of HTTP request. HTTP is a stateless protocol, which means each HTTP transaction is brand new and anonymous. As a result, the server can never know who you are even if you send two requests back to back. It treat you as a whole different person-or in other words it treats everyone as the same: nobody.
This is good in the regard of privacy. On the other hand it is also bad though, because many times users want dedicated information just for themselves, and that is unachievable through stateless HTTP connections. Cooke solves this problem. A user stores a piece of information who he is, say my name Zac Fukuda, and send it to the server. By receiving that request, now the server can know who you are, “Okay, this request must be come from Zac Fukuda. Let’s response him saying his name. ‘Hi, Zac.’”
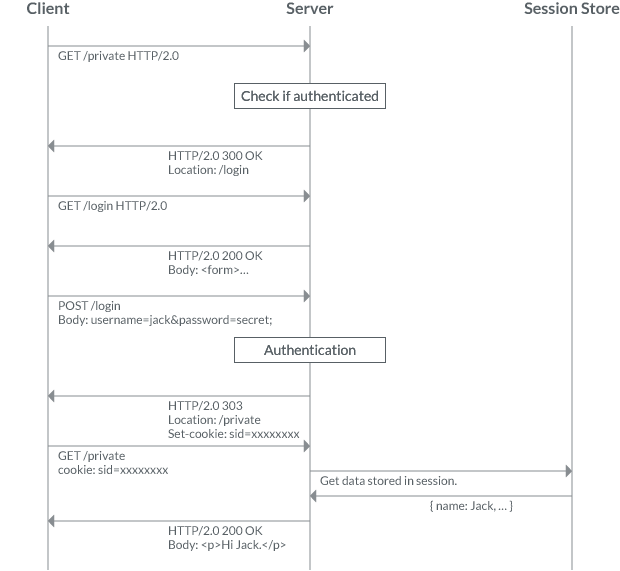
Instead of user’s name, it is usually session ID that is stored in cookie. And the identity information who is sending the request is stored inside session. Figure 3. shows you the process of typical identification of user through session and cookie.
In Passport, the usage of session is optional, since in API requests are coming along with API key and/or secret. Nevertheless, in the typical username/password authentication it is common to use session and store user’s information in there. Just like mentioned above, Passport issues cookie that contains session ID and store user’s information in session. In order for our Passport to use session and to proceed certain data mapping, please update server.js as follows:
// Strategy
…

passport.serializeUser( (user, done) => done(null, user.id) )
passport.deserializeUser( (id, done) => {
  db.users.findById(id, (err, user) => {
    if (err) { return done(err) }
    done(null, user)
  })
})

app.use(passport.initialize())
app.use(passport.session())
The passport.serializeUser() is a function to define what to store in session, whereas the passport.deserializeUser() is for what to do with that information. The data user passed to the verify callback inside passport.deserializeUser() will be accessible later as req.user.
In the code above, which is all copied from Passport’s documentation, only user’s ID is stored in session, keeping the amount of data stored within the session small—by doing this, I think, you can also improve security. Our Passport will find a user using that ID.
Of course you can store any data in session if you want. For instance, the example above will query user’s data from database for every request, which causes the server to overwork. If the only information you need is the user’s ID and name, you can store them directly in session, and restore it in session over and over again. If you need the additional user information, you can do so in the routers that require it.
Deserialization—there is no such word on Oxford English Dictionary—of the code above is highly dangerous because your password is also passed to the next process. Usually passwords are stored hashed, but for the production level you must take some data formatting.
Our current application stores sessions in MemoryStore. Under this condition, session information will be disappeared as a user closes his browser or as our application restarts. For the production environment sessions must be stored in database like Redis, Memcached, or even MongoDB. I will show you how to store session in MongoDB in the future article. (If you want the practical example now, please check out 03-hashing-remember on Github)
That was the main, and hardest, part of Passport. The rest is easy, so please moving on.
Authentication Filter
In our application, the page that only authenticated users can see is the home page /. (Technically, the root page of website / is not always a “home” page. To this router, we have to insert a filter logic. To do is very easy: you simply call req.isAuthenticated() to check if a user is authenticated. If he is, show him the home page; if he doesn’t, redirect him to the login page. The isAuthenticated() function is extended to request by Passport, and this only works with Passport. Please update our root router as follows:
app.get('/', (req, res) => {

  // Check if a user is logged-in, is authenticated
  if ( !req.isAuthenticated() ) {
    res.redirect('/login')
    return
  }

  res.render('index', {
    title: 'Home',
    user: req.user
  })
})
This example is one of approaches. You can separate the filter into another middleware just like this:
// This is an example of alternative approach.
// Please don’t add this code
app.get('/', (req, res, next) => {

  // Check if a user is logged-in, is authenticated
  if ( !req.isAuthenticated() ) {
    res.redirect('/login')
    return
  }

  return next()

}, (req, res) => {
  res.render('index', {
    title: 'Home',
    user: req.user
  })
})
Log User Out
Logging a user out is even easier than to insert authentication filter. All you have to do is to call req.logout(), which is also a function extended by Passport, then redirect a user to non-filtered page. Please add req.logout() into the callback of app.get('/logout'):
app.get('/logout', (req, res) => {
  req.logout()
  res.redirect('/login')
})
That’s it.
Run
The final result of server.js would look like this:
// Common modules
const path = require('path')

// Initializing Express
const express = require('express'),
      app = express(),
      port = 3000

// Middlewares
const cookieParser = require('cookie-parser'),
      session = require('express-session'),
      bodyParser = require('body-parser')

app.use(cookieParser())
app.use(session({
  secret: 'cats',
  resave: false,
  saveUninitialized: false
}))
app.use(bodyParser.urlencoded({ extended: false }))
app.use(express.static(path.join(__dirname, 'public')))

// If want to show flash message
const flash = require('connect-flash')
app.use(flash())

// View engine
app.set('views', path.join(__dirname, 'views'))
app.set('view engine', 'pug')

// Database
const db = require('./db')

// Passport
const passport = require('passport'),
      Strategy = require('passport-local').Strategy

passport.use(new Strategy( (username, password, done) => {
  db.users.findByUsername(username, (err, user) => {

    // If any error
    if (err) { return done(err) }

    // If no user found
    if (!user) {
      return done(null, false, {
        message: 'No user found.'
      })
    }

    // Password not matched
    if (user.password != password) {
      return done(null, false, {
        message: 'Password not matched.'
      })
    }

    return done(null, user)
  })
}))

passport.serializeUser( (user, done) => done(null, user.id) )
passport.deserializeUser( (id, done) => {
  db.users.findById(id, (err, user) => {
    if (err) { return done(err) }
    done(null, user)
  })
})

app.use(passport.initialize())
app.use(passport.session())

// Routers
app.get('/', (req, res) => {

  // console.log(req.session)

  // Check if a user is logged-in, is authenticated
  if ( !req.isAuthenticated() ) {
    res.redirect('/login')
    return
  }

  res.render('index', {
    title: 'Home',
    user: req.user
  })
})

app.get('/login', (req, res) => {

  // If any error
  console.log(req.flash('error'))

  res.render('login', { title: 'Login' })
})

app.post('/login', passport.authenticate('local', {
  successRedirect: '/',
  failureRedirect: '/login',
  failureFlash: true
}))

app.get('/logout', (req, res) => {
  req.logout()
  res.redirect('/login')
})

// Run server
app.listen(port, () => console.log(`Example app listening on port ${port}!`))
After finish writing it, please execute the following command to run our application:
$ node server.js
# Or with Nodemon
$ nodemon server.js
Please visit localhost:3000—it will redirect you to the login page—and log-in with the username/password combination of jack/secret or jill/birthday. If you logged in successfully, you will see the home page saying “Welcome to Home, username.”
Bonus
If you add console.log(req.session) into the middleware of app.get('/'), the application will log the session. In the case for Jill the session will be like this:
Session {
  cookie:
   { path: '/',
     _expires: null,
     originalMaxAge: null,
     httpOnly: true },
  passport: { user: 1 } }
You see Jill’s ID “1” is set to user. From this, you can also see that the data of user is passed to the callback of passport.deserializeUser() as a parameter.
Next
So far I showed you how to use Passport and its local strategy for authenticating a user. In the next tutorial, I’m going to show you how to authenticate user fetching his information from MongoDB, and how to let a user sign up your application then manually log him in at his signup completion.
Reference
- Passport.js
- passport-local (Github)
- Passport - Express Local Example (Github)
- connect-flash (Github)