Amazon Simple Email Service(SES), Lambda, API Gateway
The Email Solution
Yesterday I sent a happy-birthday message to one of my friends. I sent it on Messenger, not by email. That gives me a sense of melancholy. Email was a break through. Within thirty years, it is kind of antique. We don’t send email to our friends any more. Companies, however, send trillions of them. Sign-up notice, order confirmation, newsletter, privacy policy updates, and so on.
I recently embedded a contact form to my website. There are number of ways to do it. I decided to use Amazon Web Service(AWS).
In this post, I am going to show you how I developed the backend of contact form with Amazon Simple Email Service(SES), Lambda, and API Gateway. I use Node.js for the Lambda function.
Throughout this post it assumes that the AWS region is set in North Virginia(us-east-1). If you use other region, please don’t forget to replace us-east-1 with your region in the process.
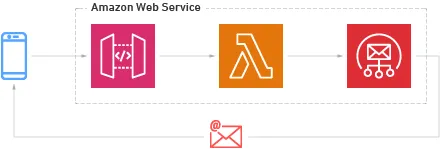
Overview
Here is how the system looks like:
Verify Domain/Email in SES
To send email through SES you have to verify either your domain or email. In case when the wizard is changed by the time you read this, here are the official documentations:
It is preferable that you have your own domain verified and issue DKIM key for production.
Follow the next steps before verifying either domain or email:
- Login it to AWS console.
- Go to SES.
- Click Create identity.
Verify Domain
In the wizard:
- Fill the fields with the following information
- Identity type: Domain
- Domain: {your-domain-name}
- Advanced DKIM settings: Easy DKIM
- DKIM signing key length: RSA_2048_BIT
- Publish DNS records to Route53: checked (If you use Route53)
- DKIM signatures: Enabled
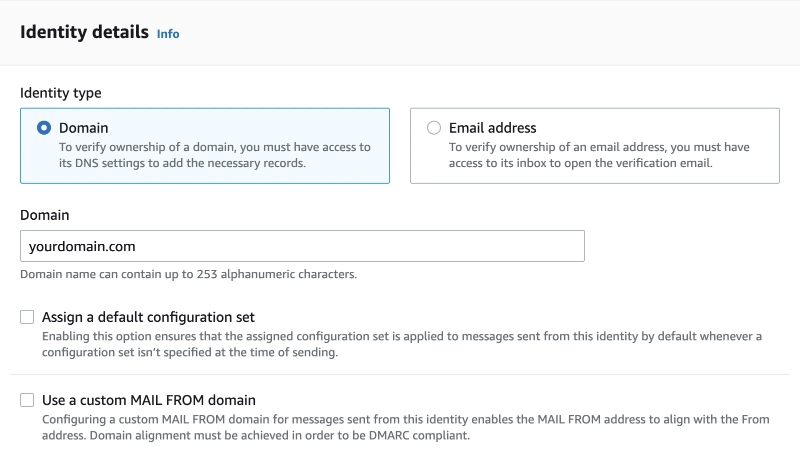
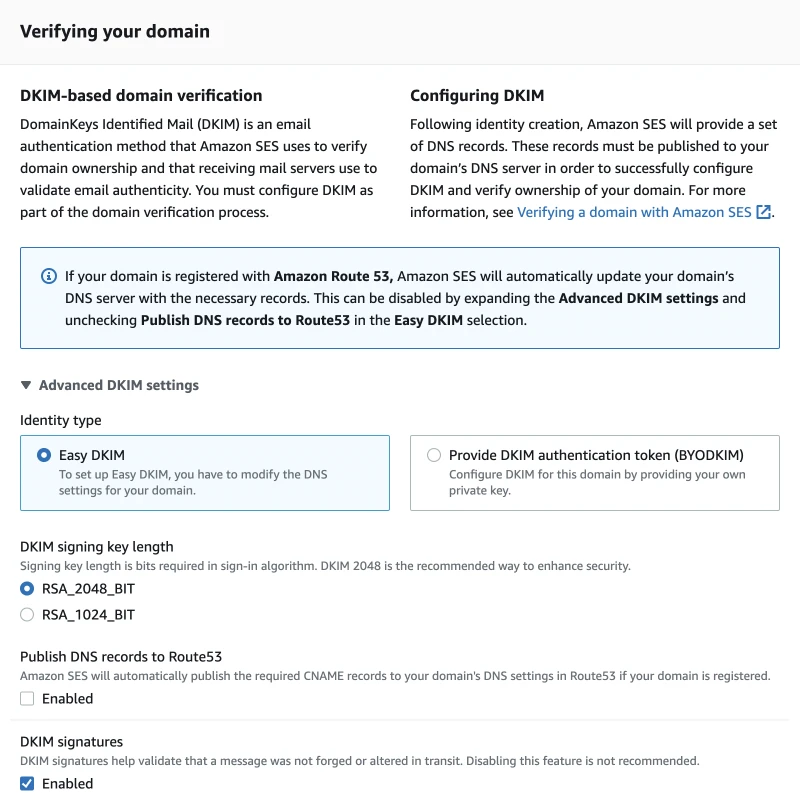
- Click Create identity.
- Update the DNS records (on your DNS provider)
- Wait until your domain is verified.
(In my case I added three new CNAME records.)
Verify Email
In the wizard:
- Fill the fields with the following information:
- Identity type: Email address
- Email address: {your-email-address}
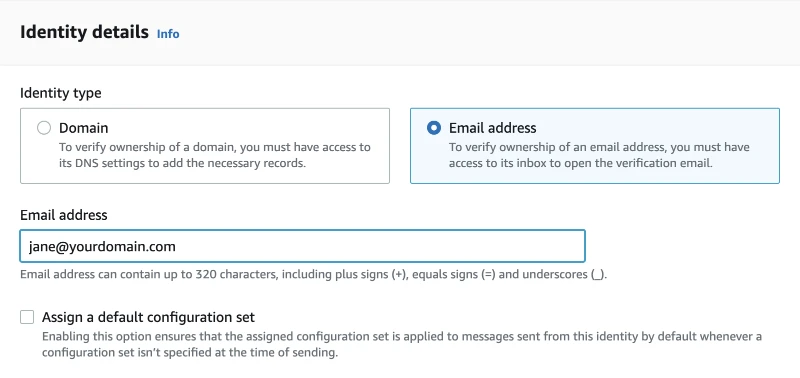
- Click Create identity.
- Click the URL in the verification email.
Sandbox
By default you are in the SES sandbox, meaning you can only send email to the verified email. In other words, you can only send email to yourself! To send any email address, you must go out of the sandbox. Please refer to Moving out of the Amazon SES sandbox, and request a production access. It takes about 24 hours for your request to be confirmed.
Send Test Email
Before moving on, please make sure that you can send email through SES.
- Go to one of the verified identities.
- Click Send test email.
- Fill the form anything you like.
- Send.
Make Lambda Function
We make a function that calls send-action on SES.
- Go to Lambda.
- Click Create function.
- Fill the wizard with:
- Author from scratch
- Function name: sendEmailBeta
- Runtime: Node.js 16.x (if no higher version is released yet)
- Architecture: arm64
- Execution role: Create a new role with basic Lambda permissions
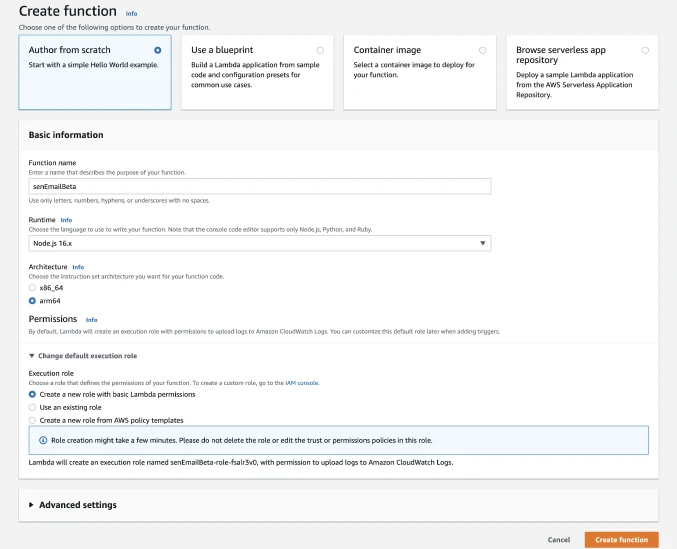
Lambda will create a new role sendEmailBeta-role-{strings}. I selected arm64 as an CPU architecture for no reason. You can choose one that you like, but arm64 is bit cheaper than x86_64. See pricing.
Assign policy
The new role created by Lambda cannot make any action to SES upon creation. To give it an permission, you have to assign a new policy to the role.
- Go to IAM.
- Select Roles from the side menu.
- Select sendEmailBeta-role-{strings}
- In the section Permissions policies, click Add permissions then Create inline policy.
- Open JSON panel.
- Paste the JSON below:
{
		"Version": "2012-10-17",
		"Statement": [
				{
						"Sid": "VisualEditor0",
						"Effect": "Allow",
						"Action": "ses:SendEmail",
						"Resource": "*"
				}
		]
}- Click Review policy.
- Enter name SESSendOnlyBeta.
- Click Create policy
If you want more restriction to resources, you can replace the wildcard with the following:
"Resource": [
		"arn:aws:ses:us-east-1:{your-aws-account-id}:identity/*",
		"arn:aws:ses:us-east-1:{your-aws-account-id}:configuration-set/*"
]
The AWS official document states that you should add ses:SendRawEmail to Action property but SES v2 seems not having that one.
Environment variables
Back to Lambda.
You may not want to write delicate information like your email address in the code. Lambda supports environment variables that are accessible with process.env. To set the variables:
- Open Configuration panel.
- Select Environment variables from the side menu.
- Click Edit
- Enter the key-value pairs shown in the table below:
| Key | Value |
|---|---|
| REGION | us-east-1 |
| FROM | {your-email-address} |
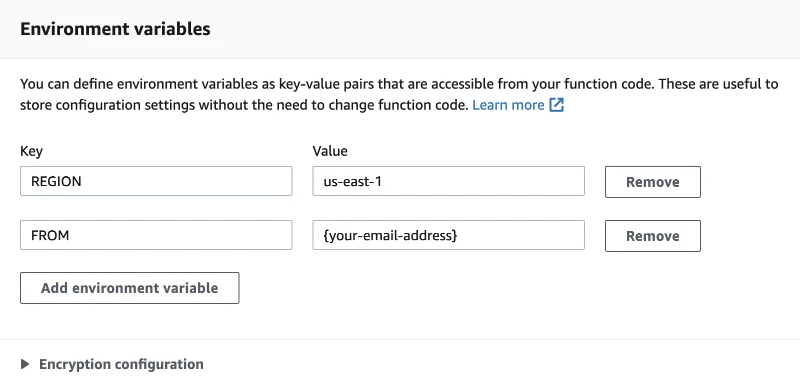
- Click Save
Coding
Back to code editor:
- Paste the next code:
index.js
const aws = require('aws-sdk');
const ses = new aws.SES({ region: process.env.REGION });
const headers = {'Content-Type': 'application/json', 'Access-Control-Allow-Origin': '*'};
const from = process.env.FROM;

exports.handler = async function(event) {
	const {name, email} = JSON.parse(event.body);
	let statusCode = 200, body = '';

	// DO ERROR HANDLING BEFORE SENDING EMAIL

	let params = {
		Source: from,
		Destination: {
			ToAddresses: [email],
			// BccAddresses: [from] // Send a copy for yourself
		},
		Message: {
			Subject: {
				Charset: 'UTF-8',
				Data: `Testing sendEmailBeta`
			},
			Body: {
				Text: { Data: `Hello, ${name}` }
			}
		}
	};

	try {
		await ses.sendEmail(params).promise();
	} catch (err) {
		console.error(err);
		statusCode = 400;
		body = err.toString();
	}

	return {statusCode, headers, body};
};
When the function is invoked through API Gateway, the request’s body—JSON strings presumably—will be set to the property body.
- Click Deploy.
Invocation Test
- Go to Test panel.
- Fill the fields with:
- Test event action: Create new event
- Event name: EmailReceived
- Event sharing settings: Private
- Template: (whatever)
- Paste the next JSON to the editor:
{
  "body": "{\"email\": \"zac.s.fukuda@gmail.com\", \"name\": \"Zac Fukuda\"}"
}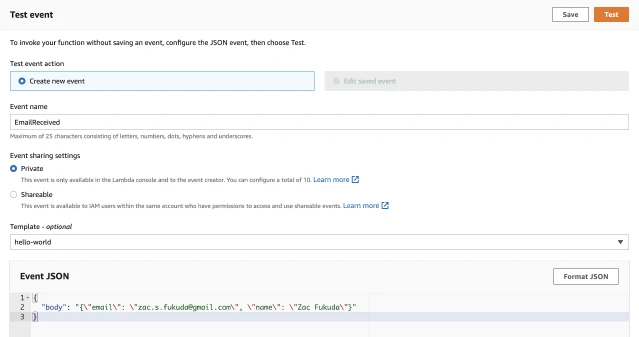
- Click Save.
- Click Test.
Open API Gateway
You have two options to create a new API.
The first one is to create it from API Gateway dashboard. The second is to add a trigger from the Lambda dashboard and select API Gateway. The latter is easier. Yon fill only one form and boom. You get the API. There are drawbacks though. When you create a new API from Lambda, the path to invoke the Lambda function will be the name of your function. In this case, if you name the function same as mine, the path name will be /sendEmailBeta. That isn’t beautiful. The first option, creating API from API Gateway, is still an easy task to launch new APIs. You only have to follow the linear guideline, and get more flexibilities on configuration.
I personally like to make an API from the API Gateway. I want to have more customization and fully understand how exactly it is configured.
From API Gateway (opt.1)
- Go to API Gateway dashboard.
- Click HTTP API’s Build.
- Enter the following information:
- Integration: Lambda
- AWS Region: us-east-1
- Lambda function: sendEmailBeta (arn)
- Version: 2.0
- API name: MiscBeta
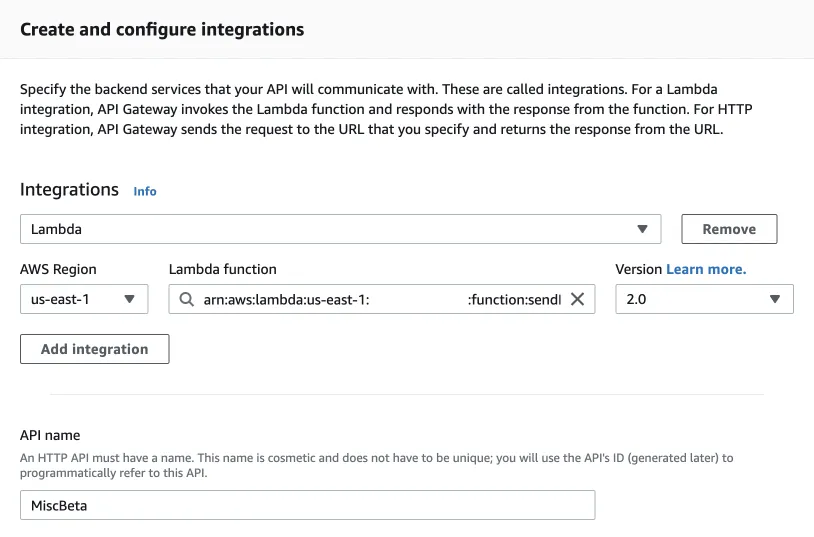
- Click Next.
- Enter these information:
- Method: Post
- Resource path: /message
- Integration target: sendEmailBeta
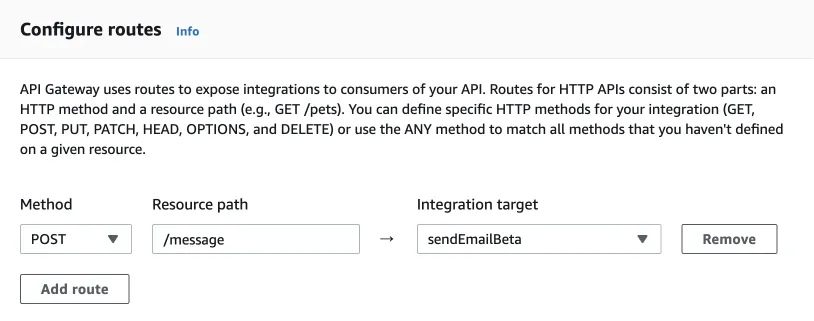
- Click Next
- Configure:
- Stage name: v1
- Auto-deploy: On (if you want)
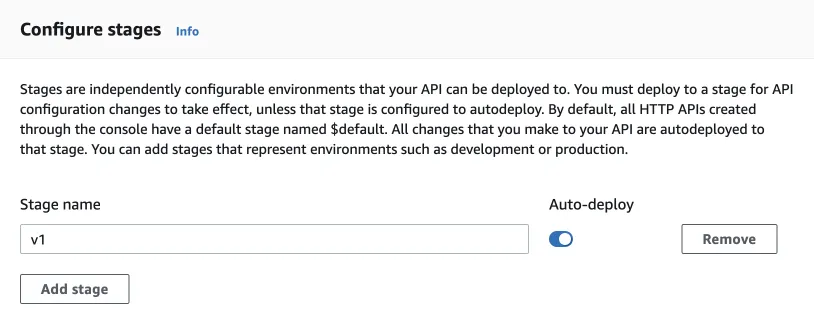
- Click Next.
- On the Review, click Create.
The endpoint to invoke a sendEmailBeta will be:
https://{api_id}.execute-api.us-east-1.amazonaws.com/v1/messagePlease take a note of your own URL. You will need it later to send requests.
From Lambda (opt.2)
On the Lambda function page:
- Click Add trigger.
-
Fill the fields with the following information:
- Intent: Create a new API
- API type: HTTP API
- Security: Open
- API name: MiscBeta
- Deployment stage: v1
- Cross-origin resource sharing(CORS): checked
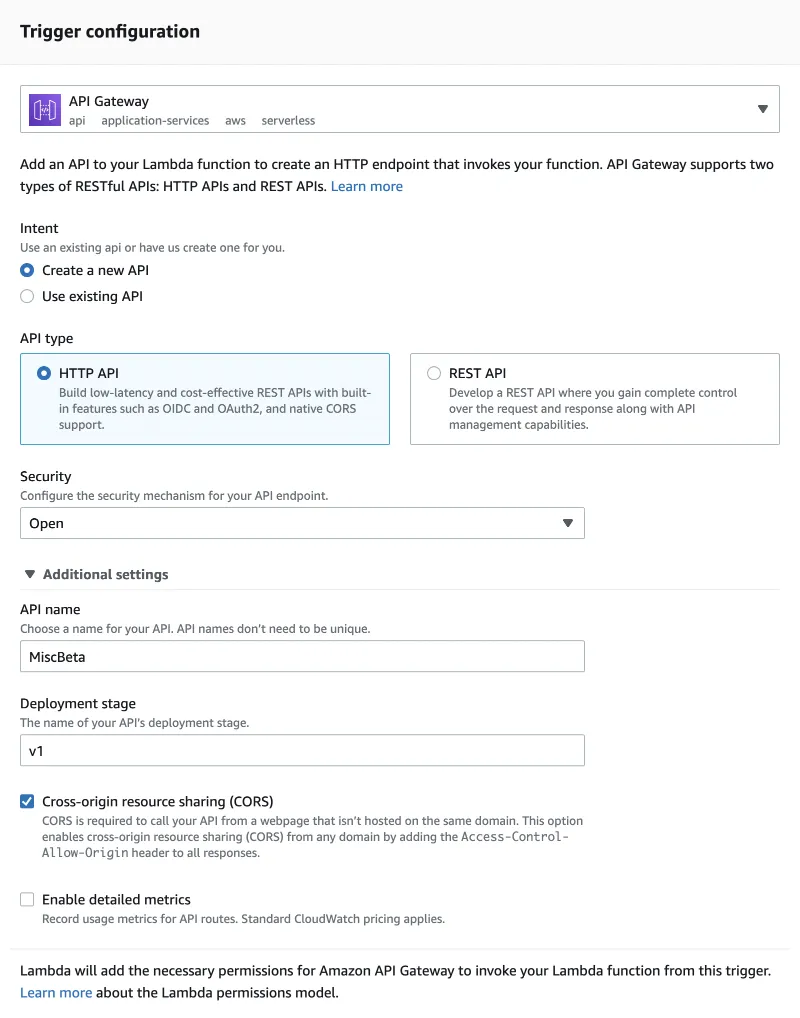
- Click Add
This time the endpoint will be:
https://{api_id}.execute-api.us-east-1.amazonaws.com/v1/sendEmailBetaCORS
Without cross-origin resource sharing(CORS) enabled, any request from your website will be rejected because you cannot host the website on amazonaws.com. For testing, let’s add wildcard to the allowed-origins.
- Go to CORS from the left navigation menu.
- Add * to Access-Control-Allow-Origin.
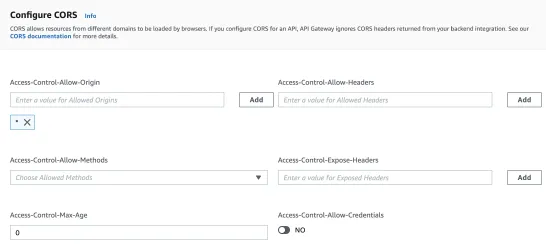
- Click Save.
Post Request
Now all you have to do on backend is done. The last thing you do is to send a post request with your email address and your name. You can either use cURL or Postman.
When I run localhost and use fetch API, the Gateway rejected the request despite of 'Access-Control-Allow-Origin': '*'.
cURL
Open Terminal and hit the next command:
curl --location --request POST 'https://{api_id}.execute-api.us-east-1.amazonaws.com/v1/message' \
--header 'Content-Type: application/json' \
--data-raw '{
		"email": "{your-email-address}",
		"name": "{your-name}"
}'

# If you created the API from Lambda, the last path of endpoint will be "/sendEmailBeta"
Postman
If you have Postman’s account, simply make a request with :
- Sign in/up Postman.
- Confiture the request with the information below:
- Method: Post
- URL: https://{api_id}.execute-api.us-east-1.amazonaws.com/v1/message
- Body:
- raw
- JSON
{
	"email": "{your-email-address}",
	"name": "{your-name}"
}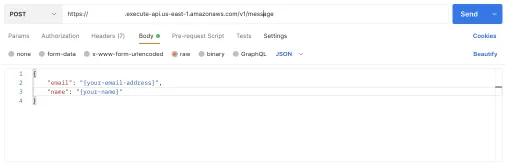
- Click Send
Next
Access Control
Above I showed you to enter * for Access-Control-Allow-Origin in the CORS setting. When you deploy your API for production, you must restrict the origin only to your website—or your partners’ if necessary.
Authorization
Having chosen HTTP API, you have three options for access control. They are Lambda function, JWT, and IAM. The security is a delicate field of topic to talk about publicly. So, to be safe, I decide not to write on this. (Besides, this topic requires another dedicated post; I leave it for future, perhaps.)
For how to configure authorization, see Controlling and managing access to an HTTP API in API Gateway.
Validation/Error Handling
You may also have to implement security at the application level, i.e. Lambda function—and/or on the client-side. Senders can forget to enter their name. In which case, instead of sending email that the name is blank, it is better to respond feedback to them, guiding that they should enter the name. (This validation should be undertaken even before sending requests.)
Custom Domain Endpoint
You can set up the custom domain as an endpoint of your API, like https://api.your-domain.com, which I’ve done for my own. The customization involves DNS setting, Certificate Manager, CloudFront, and such. It is bit of more tasks to do.
For how to do it, see Setting up custom domain names for REST APIs.
Resources
- How do I send email using Lambda and Amazon SES?
- Using AWS Lambda with Amazon API Gateway
- How to Receive Emails from Your Site's "Contact Us" form Using AWS SES, Lambda, & API Gateway
- Serverless Email System - Cloudformation stack using AWS SES, Lambda, API Gateway and Dynamodb
- Sending Emails using AWS SES, Lambda and API Gateway
- Api Gateway -> Lambda (Send Email) -> SES (Simple Email Service)