GraphQL + MongoDB: Express
The source code is available on Github.
Following the two of my previous articles, GraphQL + MongoDB: Basic – Query and Mutation, I am going to show you how to build simple GraphQL API server that communicates with MongoDB using Express.js. The reader can easily follow this tutorial without having followed the previous articles, but the codes shown below are mostly based on the codes from them. Therefore, I am going to skip explaining details.
Prerequisites
In order to follow this tutorial you are required to have…
- Node.js & NPM, and Yarn installed.
- MongoDB installed.
- Previous experience in Node.js application development with MongoDB.
As of this writing, I tested the sample code shown below with Node.js v8.11.1 and MongoDB v3.4.4. I cannot guarantee that the code I give you here works with the later version of Node.js and MongoDB. So if you encounter any bugs due to the version difference, please find a issue and solution on your own.
A programmer who is new to programming might be able to follow the tutorial. Yet, I encourage you to try REST API before trying GraphQL.
Before Getting Started
From now on, please follow the tutorial opening proper directory in Terminal.
$ cd /path/to/your/working/directory

// Or if you download repository from Github
$ cd ./graphql-mongo/Express
Keep Running MongoDB Demon
While you are following this tutorial, please make sure that your local MongoDB is up running. (You need to open two Terminal windows: One for Mongo Demon and another for running Node.js. I assume that you are using iTerm.)
$ mongodInitializing NPM Project
Let’s initialize a new NPM project and install packages needed:
$ yarn init
$ yarn add express express-graphql graphql mongoose
$ yarn add --dev mongodb nodemon
Although nodemon is unnecessary for development, I use it to monitor file changes so that the server will restart on those changes. Also, mongodb is being used just for seeding initial data.
Seeding Initial Data
It is possible to generate initial data with GraphQL but we want to try querying first. Thus, we generate those data with simple Javascript code. Please make two files called config.js and seed.js at the root of your working directory and add the following codes:
./config.js
module.exports = {
  dbURL: 'mongodb://localhost:27017',
  dbName: 'graphql',
  collectionName: 'books'
}
./seed.js
const { MongoClient } = require('mongodb')
const assert = require('assert')
const { dbURL, dbName, collectionName } = require('config')

let books = [
  {
    'title': 'David and Goliath',
    'author': 'Malcolm Gladwell'
  },
  {
    'title': 'Steve Jobs',
    'author': 'Walter Isaacson'
  }
]

// Connect to the server
MongoClient.connect(dbURL, function(err, client) {
  assert.equal(null, err)
  console.log('Connected successfully to server')

  const db = client.db(dbName)
  const collection = db.collection(collectionName)

  collection.insertMany(books, (err, result) => {
    if (err) {
      console.log(err)
    } else {
      console.log('Documents inserted!')
    }

    client.close()
  })
})
After making these files, please run:
$ node seed.jsIf you have followed the previous tutorials, you can skip creating seed.js and executing its program.
Plus, please note that in this tutorial I am using database called graphql. Since it is a common name, if you already have a database in the same name, please replace dbName in config.js with anything you like.
Getting Started
There are basically four steps to build our GraphQL API application.
- Define Mongoose Model—in our case which is Book
- Define GraphQL schema
- Define resolvers
- Put everything together
In fact, it does not matter whether you define Mongoose model or GraphQL schema first. But since this article is about GraphQL, I will leave those parts later in order to show you them sequently.
Define Mongoose Model
First, let’s create a folder that holds Mongoose-model files:
$ mkdir MongooseModelAnd please create a new file called Book.js inside that folder.
$ touch MongooseModel/Book.jsThere is nothing special about our Book model. It is just a model that has two fields title and author. Please add the follow code to the file.
./MongooseModel/Book.js
const mongoose = require('mongoose')

// Mongoose Model
const bookSchema = new mongoose.Schema({
  title: String,
  author: String
})

// Export Mongoose "Book" model
module.exports = mongoose.model('Book', bookSchema)
If you want to know how to use Mongoose, please refer to their NPM page.
The Book.js is exactly same as the one used in the method 2 of previous article. So if you have followed it, you can simply copy the file from your previous directory.
Define GraphQL schema
The schema we define is nothing different from the one used in the previous article—except that this time I leave the sample schema used in GraphQL’s official sample code.
To define schema, let’s create a new file called schema.js at the root of your working directory.
$ touch schema.jsAnd the inside of file looks like this:
./schema.js
const { buildSchema } = require('graphql')

module.exports = new buildSchema(`
  type Book {
    _id: String
    title: String!
    author: String!
  }

  type Query {
    hello: String
    books: [Book]
  }

  type Mutation {
    addBook(title: String!, author: String!): Book!
    removeBook(title: String!): Book!
  }
`)
Define resolvers
After defining schema, next thing we should do is to define our resolvers, which is responsible for how our GraphQL should respond to given query. Let’s create a new file called resolvers.js at the root of your working directory and please add the following code:
$ touch resolvers.js./resolvers.js
const Book = require('./MongooseModel/Book')

const resolvers = {
  hello: (args, context) => {
    return context.greeting
  },
  books: async (args, context) => {
    // See "greeting: 'Hello world!'" in Terminal
    console.log(context)

    return (await Book.find())
  },
  addBook: async (args, context) => {
    var newBook = new Book({
      title: args.title,
      author: args.author
    })

    var err = await newBook.save()

    if (err) return err
    return newBook
  },
  removeBook: async (args, context) => {
    var doc = await Book.findOneAndRemove({
      title: args.title
    })

    return doc
  }
}

module.exports = resolvers
Again, the code shown above is almost same as the one shown in the previous article. The only differences are the addition of hello resolver and console.log() of books resolver. The reason why I added context is just to see how our resolvers are passed its value from our server file.
You find that the Mongoose model Book we defined earlier is imported to this file and each resolver uses to manipulate data with database.
Now it is time to wrap everything up.
Put Everything Together
We only need one extra file to run our server, and it is server.js. So, let’s create that file and add the following code to it.
$ touch server.js./server.js
const express = require('express')
const graphqlHTTP = require('express-graphql')
const mongoose = require('mongoose')

// Import GraphQL components
const schema = require('./schema')
const resolvers = require('./resolvers')

// Import configuration and connect to DB
const { dbURL, dbName } = require('./config')
mongoose.connect(dbURL + '/' + dbName)

// Define "context" just for testing
const context = {
  greeting: 'Hello world!',
}

// Set up Express server
const app = express()
app.use('/graphql', graphqlHTTP({
  schema: schema,
  rootValue: resolvers,
  context: context,
  graphiql: true
}))

app.listen(4000);
console.log('Running a GraphQL API server at localhost:4000/graphql')
Our entry point for GraphQL is /graphql—just as most of tutorials are—and our Express server processes incoming request to our GraphQL server.
Running Application
Everything all set, and you are good to go. Assuming that you installed Nodemon earlier, please run your server with following command:
$ nodemon server.jsIf you downloaded Git repository, you can also run server with yarn start.
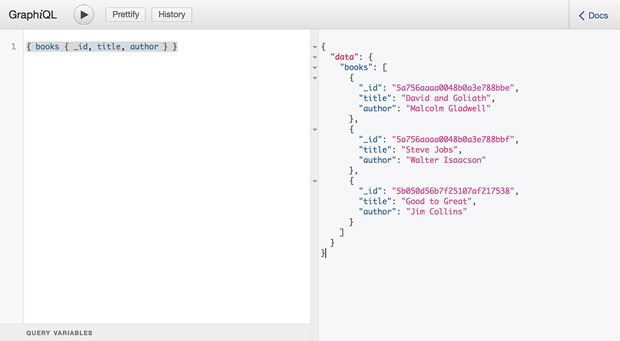
Now open http://localhost:4000/graphql in your browser and you see GraphiQL.
On the left is the window in which you type your query, and on the right is the result of that query.
Here are the inputs you may want to try and its expected corresponding results. (Perhaps I do not have to explain this but each _id is an unique value, so it won’t match to your result.)
Query
Input:
{ books { _id, title, author } }Output:
{
  "data": {
    "books": [
      {
        "_id": "5a756aaaa0048b0a3e788bbe",
        "title": "David and Goliath",
        "author": "Malcolm Gladwell"
      },
      {
        "_id": "5a756aaaa0048b0a3e788bbf",
        "title": "Steve Jobs",
        "author": "Walter Isaacson"
      }
    ]
  }
}
Mutation – addBook
Input:
mutation {
  addBook (title: "The Intelligent Investor", author: "Benjamin Graham") {
    _id
    title
    author
  }
}
Output:
{
  "data": {
    "addBook": {
      "_id": "5b1a72e9007d1f035d5f5555",
      "title": "The Intelligent Investor",
      "author": "Benjamin Graham"
    }
  }
}
Before moving on, you may want to re-query { books { _id, title, author } } in order to see your new book data is saved in your MongoDB.
Mutation – removeBook
Input:
mutation {
  removeBook (title: "The Intelligent Investor") {
    _id
    title
    author
  }
}
Output:
{
  "data": {
    "removeBook": {
      "_id": "5b1a72e9007d1f035d5f5555",
      "title": "The Intelligent Investor",
      "author": "Benjamin Graham"
    }
  }
}
That’s it
You can easily customize your GraphQL by adding new schema, resolver, and furthermore a new model and type. Next step is to create a front-end application with React.js that works with our GraphQL server that we just created so that you can send query requests from browser, not from GraphiQL.
Please check out my next article GraphQL + MongoDB: React.