
Amazon ECS Blue/Green Deployment Step-by-Step Guide
About a year ago, in July 2025, AWS announced the support for native blue/green deployment of ECS service. By then, in order to deploy ECS service in blue/green strategy, we needed CodeDeploy application.
In this blog, I will show you the step-by-step guide how to launch ECS service that is blue/green deployment ready. This blog differs from the other blogs on the same topic in that the ECS service runs in the private subnets. In production, the ECS services are likely to be run in the private subnets to enhance the security. With the ECS running within the private subnets, the networking architecture will be more complicated. Isolation from the Internet increases the probability of network error, which is hard to identify the cause and hard to resolve. This blog covers how to make the private ECS service communicate with the external services.
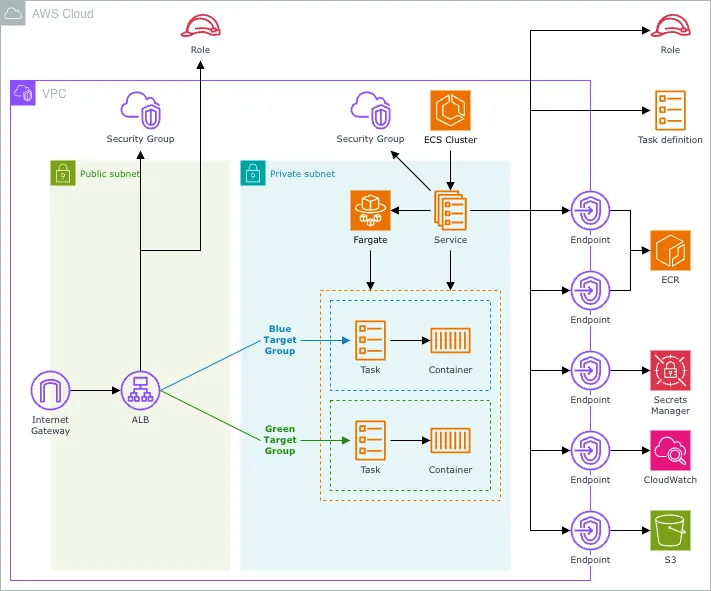
The figure above illustrates the overview of architecture for the blue/green ECS.
The heart of our architecture is the ECS service that runs task(s)/container(s) in the private subnets in VPC. Our task runs custom Nginx image hosted in the private ECR repository and launched by Fargate. The ECS service, within the private subnets cannot communicate with the external services outside VPC. VPC endpoints enable the ECS service to communicate with AWS services necessary to pull the image from ECR, and to make it send logs to CloudWatch.
In front of the ECS service is Application Load Balancer(ALB), created in the public subnets. In addition to load balancing, ALB is responsible for blue/green deployment. More on this later.
Security groups for ALB, ECS, and VPC endpoints enhance the security, by restricting where the network requests can come from and where the network requests can go to.
How Blue/Green Deployment Works
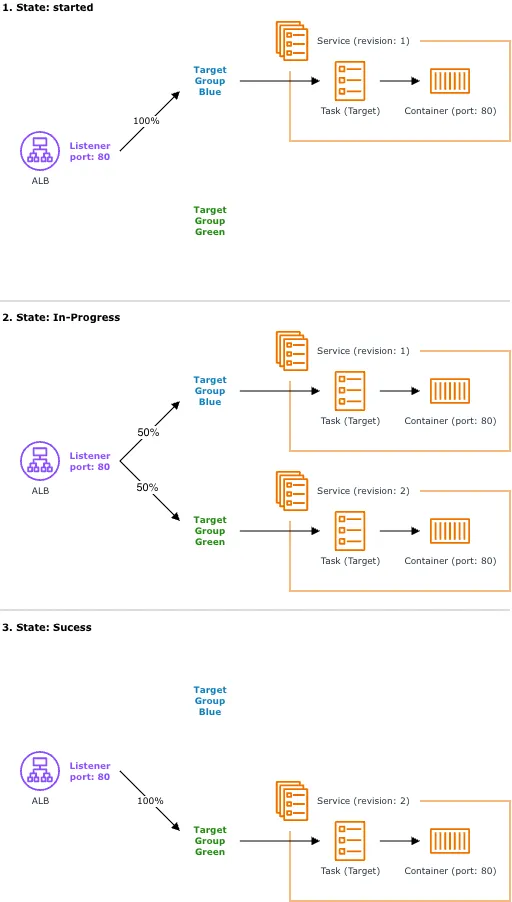
The figure above illustrates how the state of ECS service transitions during the blue/green deployment.
Whatever the state the ECS service is the ALB always has two target groups—Blue and Green.
At the first state, when new service revision has just been started to be deployed, only one service revision—Service Revision 1—is up running. The ALB sends all traffics to this service revision. Target Group Green is standing by, waiting for a new service revision up running.
Second, during the deployment, the Service Revision 1 and the new Service Revision 2 both are up running. After the Service Revision 2 was up, the ALB split all traffics into halves—50% to the Target Group Blue(Service Revision 1) and 50% to the Target Group Green(Service Revision 2). This traffic splitting continues for bake time period, default to be fifteen minutes.
After the bake time, having assumed the deployment of the Service Revision 2 is success and responds no error, the ALB shift all traffics to the Target Group Green(Service Revision 2). Finally, the ECS destroys the old service revision, and the deployment is success.
Steps
Here are steps to launch an ECS service that is deployed in blue/green strategy:
- Create VPC (public/private subnet, security group, endpoints)
- Create ELB (ALB, target groups, listener, listener rules)
- Create ECR (repository)
- Create ECS (task definition, Cluster, service)
I used Tokyo(ap-northeast-1) region to create the resources. Please replace region codes and AWS account IDs with your own while following the steps.
To make the guide more understandable, when listing the field inputs, the empty fields and the default inputs are omitted from the list.
AWS Resources
Here is the list of all resources that will be created.
| Resource | Name |
|---|---|
| VPC | learning-ecs-vpc |
| Public subnet | learning-ecs-subnet-public1-REGIONa |
| Public subnet | learning-ecs-subnet-public2-REGIONc |
| Private subnet | learning-ecs-subnet-private1-REGIONa |
| Private subnet | learning-ecs-subnet-private2-REGIONc |
| Security group | learning-ecs-sg-alb |
| Security group | learning-ecs-sg-ecs |
| Security group | learning-ecs-sg-endpoint |
| Endpoint | learning-ecs-vpce-ecr-dkr |
| Endpoint | learning-ecs-vpce-ecr-api |
| Endpoint | learning-ecs-vpce-secretsmanager |
| Endpoint | learning-ecs-vpce-logs |
| Endpoint | learning-ecs-vpce-s3 |
The AZ identifiers of subnets—like “a” and “c”—can be different based on the region.
| Resource | Name |
|---|---|
| ALB | learning-ecs-alb |
| Listener | HTTP:80 |
| Listener rule | 100 |
| Listener rule | Last (default) |
| Target group | learning-ecs-blue-target-group |
| Target group | learning-ecs-green-target-group |
| Resource | Name |
|---|---|
| Private repository | learning-ecs/my-nginx |
| Resource | Name |
|---|---|
| Cluster | learning-ecs-cluster |
| Service | learning-ecs-task-service |
| Task definition | learning-ecs-task |
| Resource | Name |
|---|---|
| Role | ecsTaskExecutionRole |
| Role | learning-ecs-alternate-target-role |
Prerequisites
- IAM User/Role that can act on the services listed above
- AWS CLI
- Docker
We cannot build an Amazon ECR image on AWS console. To build an image and push to the ECR private repository, we will use AWS CLI on the local terminal. To login in to your private ECR registry and to build an image from your local computer, Docker must be running.
Create VPC
In VPC, we will make the following resources:
- VPC × 1
- Public subnet × 2 AZs
- Private subnet × 2 AZs
- Security group × 3
- Endpoint × 5
Create VPC
- Go to “VPC > Your VPCs”.
- Click “Create VPC”.
- Fill the wizard with the following information:
- Resources to create: VPC and more
- Auth-generation: Check
- Name tag: learning-ecs
- IPv4 CIDR block: 192.168.0.0/20
- Number of AZs: 2
- Number of public subnets: 2
- Number of private subnets: 2
- NAT gateways: None
- VPC endpoints: S3 Gateway
- Enable DNS hostnames: Check
- Enable DNS resolution: Check
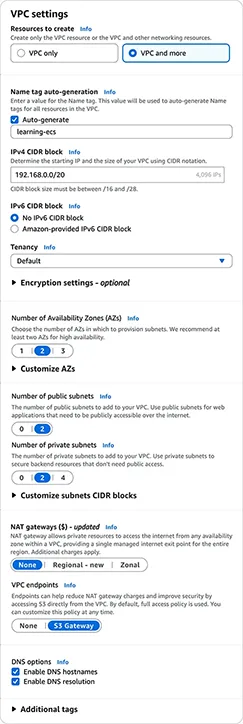
- Click “Create VPC”.
Create Security Groups
We will create three security groups for the VPC endpoints, for the ALB, and for the ECS service.
- Go to “Security Groups”.
- Repeat the following steps for each security group listed below.
- Click “Create security group”.
- Fill the wizard with the given security group information:
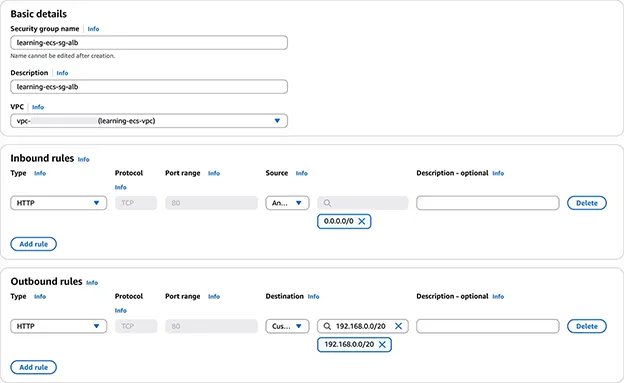
- Click “Create security group”.
The below is the information of all security groups to be created.
Security Group for the ALB
- Security group name: learning-ecs-sg-alb
- Description: learning-ecs-sg-alb
- VPC: learning-ecs-vpc
- Inbound(ingress) rule:
- Type: HTTP
- Protocol: TCP
- Port range: 80
- Source: Anywhere-IPv4
- Outbound(egress) rule:
- Type: HTTP
- Protocol: TCP
- Port range: 80
- Destination: Custom 192.168.0.0/20
Security Group for the ECS service
- Security group name: learning-ecs-sg-ecs
- Description: learning-ecs-sg-ecs
- VPC: learning-ecs-vpc
- Inbound(ingress) rule:
- Type: HTTP
- Protocol: TCP
- Port range: 80
- Source: Custom learning-ecs-sg-alb
- Outbound(egress) rule:
- Type: HTTPS
- Protocol: TCP
- Port range: 443
- Destination: Anywhere-IPv4
Security Group for the VPC endpoints
- Security group name: learning-ecs-sg-endpoint
- Description: learning-ecs-sg-endpoint
- VPC: learning-ecs-vpc
- Inbound(ingress) rule:
- Type: HTTPS
- Protocol: TCP
- Port range: 443
- Source: Custom learning-ecs-sg-ecs
- Outbound(egress) rule:
- Type: HTTPS
- Protocol: TCP
- Port range: 443
- Destination: Anywhere-IPv4
Create Endpoint
The list of endpoints required to use ECR are listed in Amazon ECR interface VPC endpoints (AWS PrivateLink). In order for ECS service to pull a container image from ECR, and to send logs to CloudWatch, we need the following VPC endpoints:
- com.amazonaws.region.ecr.dkr
- com.amazonaws.region.ecr.api
- com.amazonaws.region.secretsmanager
- com.amazonaws.region.logs
- com.amazonaws.region.s3
- Go to “Endpoints”.
- Repeat the following steps for each endpoint listed below.
- Click “Create endpoint”.
- Fill the wizard with the given endpoint information.
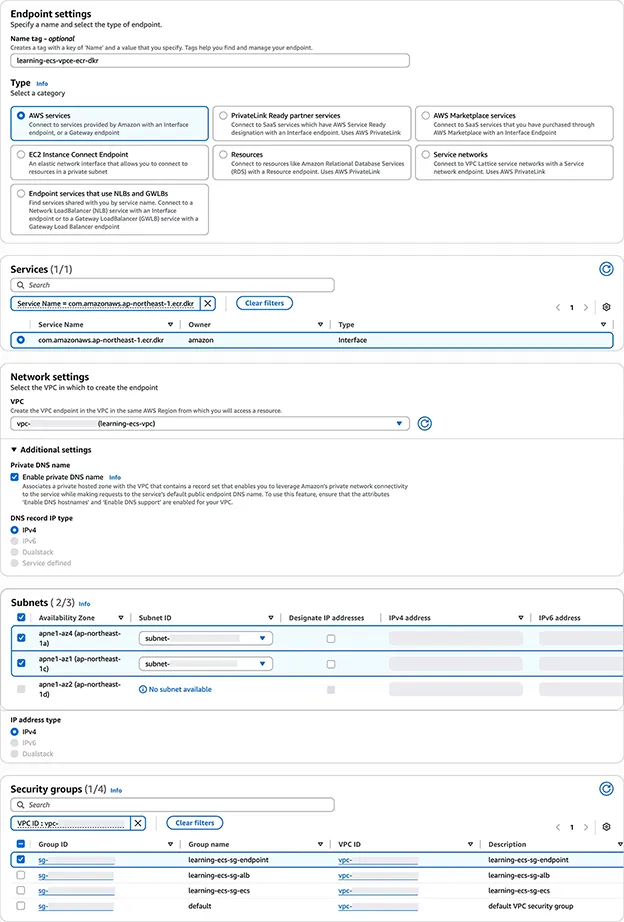
- Click “Create endpoint”.
The endpoint for S3 have been created upon the creation of VPC. We only need to create four more. The blow is the information for endpoints to be created.
To ECR Docker
- Name tag: learning-ecs-vpce-ecr-dkr
- Type: AWS services
- Service: com.amazonaws.region.ecr.dkr
- VPC: learning-ecs-vpc
- Enable private DNS name: Check
- Availability Zone:
- learning-ecs-subnet-private1-regiona
- learning-ecs-subnet-private2-regionc
- Security groups: learning-ecs-sg-endpoint
To ECR API
- Name tag: learning-ecs-vpce-ecr-api
- Type: AWS services
- Service: com.amazonaws.region.ecr.api
- VPC: learning-ecs-vpc
- Enable private DNS name: Check
- Availability Zone:
- learning-ecs-subnet-private1-regiona
- learning-ecs-subnet-private2-regionc
- Security groups: learning-ecs-sg-endpoint
To Secrets Manager
- Name tag: learning-ecs-vpce-secretsmanager
- Type: AWS services
- Service: com.amazonaws.region.secretsmanager
- VPC: learning-ecs-vpc
- Enable private DNS name: Check
- Availability Zone:
- learning-ecs-subnet-private1-regiona
- learning-ecs-subnet-private2-regionc
- Security groups: learning-ecs-sg-endpoint
To CloudWatch
- Name tag: learning-ecs-vpce-logs
- Type: AWS services
- Service: com.amazonaws.region.logs
- VPC: learning-ecs-vpc
- Enable private DNS name: Check
- Availability Zone:
- learning-ecs-subnet-private1-regiona
- learning-ecs-subnet-private2-regionc
- Security groups: learning-ecs-sg-endpoint
Create ELB
In ELB, we will make the following resources:
- ALB × 1
- Listener × 1
- Target group × 2
We’ll first make target groups then ALB because the ALB depends on target groups.
Create Target Groups
- Go to “EC2 > Target Groups”.
- Repeat the following steps for each target groups listed below.
- Click “Create target group”.
- Fill the wizard with the given target group information.
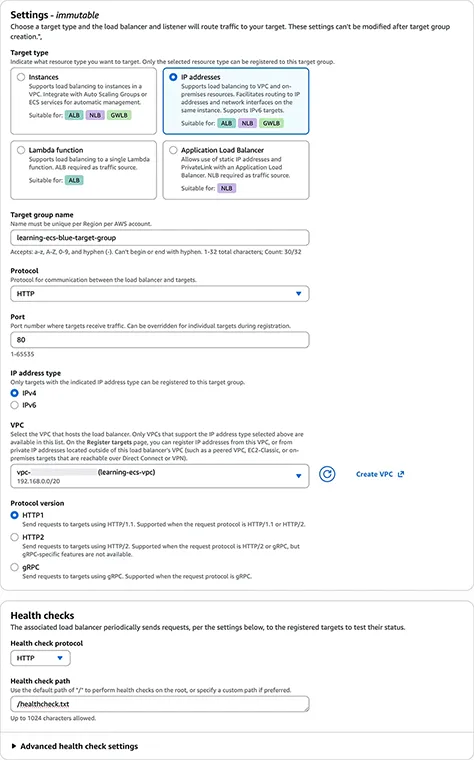
- Click “Next”.
- On the register targets step, click “Next” without any change.
- Click “Create target group”.
The below is the information of target groups to be created.
Blue Target Group
- Target type: IP addresses
- Target group name: learning-ecs-blue-target-group
- Protocol: HTTP
- Port: 80
- IP addresses type: IPv4
- VPC: learning-ecs-vpc
- Protocol version: HTTP1
- Health check protocol: HTTP
- Health check path: /healthcheck.txt
Green Target Group
- Target type: IP addresses
- Target group name: learning-ecs-green-target-group
- Protocol: HTTP
- Port: 80
- IP address type: IPv4
- VPC: learning-ecs-vpc
- Protocol version: HTTP1
- Health check protocol: HTTP
- Health check path: /healthcheck.txt
Create ALB
- Go to “Load Balancers”.
- Click the triangle icon next to “Create load balancer”, then select “Create Application Load Balancer”.
- Fill the wizard with the following information:
- Load balancer name: learning-ecs-alb
- Scheme: Internet-facing
- Load balancer IP address type: IPv4
- VPC: learning-ecs-vpc
- Availability Zones and subnets:
- regiona: Check
- regionc: Check
- Security groups: learning-ecs-sg-alb
- Listener:
- Protocol: HTTP
- Port: 80
- Routing action: Forward to target groups
- Forward to target group:
- learning-ecs-blue-target-group (Weight: 1)
- learning-ecs-green-target-group (Weight: 0)
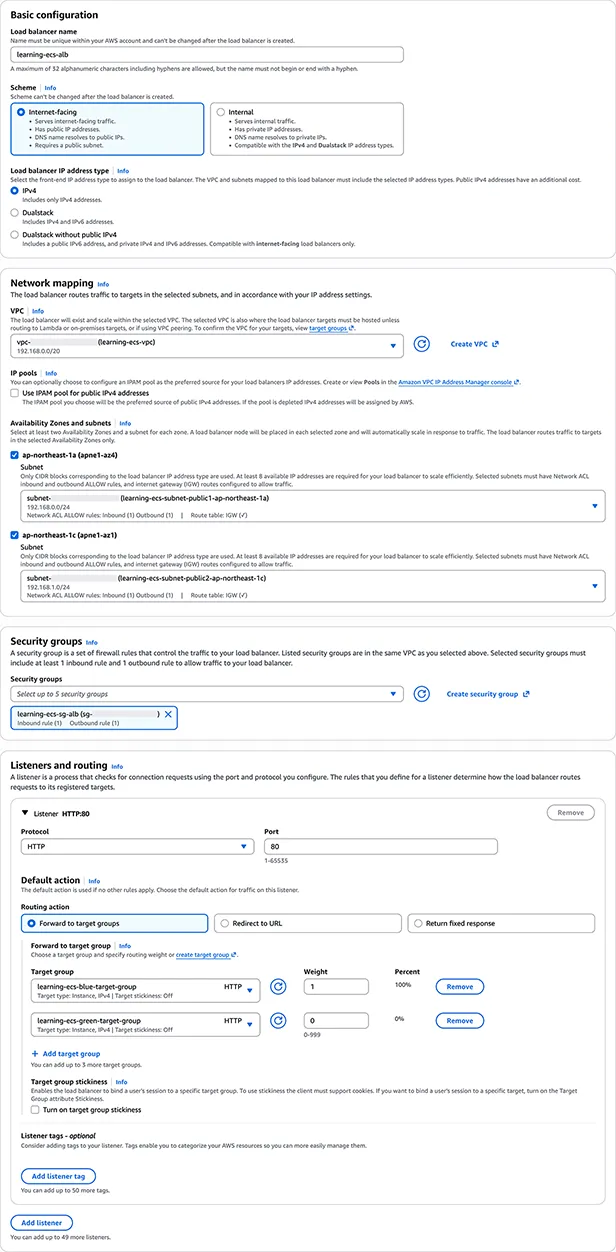
- Click “Create load balancer”.
Add Listener rule
- Click “HTTP:80” in the Listeners and rules section on the ALB’s detail dashboard.
- Click “Add rule”.
- Fill the wizard with the following information:
- Conditions:
- Path
- Match pattern type: Value matching
- Path condition value: /healthcheck.txt
- Routing action: Forward to target groups
- Forward to target group:
- learning-ecs-blue-target-group (Weight: 1)
- learning-ecs-green-target-group (Weight: 0)
- Conditions:
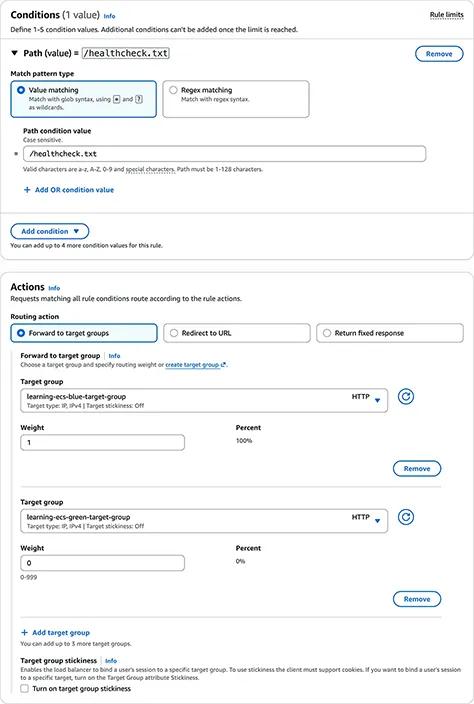
- Click Next.
- Fill the wizard with the following information:
- Priority: 100
- Click “Next”.
- Click “Add rule”.
Create ECR
In ECR, we will create the following resource:
- Private repository × 1
Create Private Repository
- Go to “ECR”.
- Click “Create”.
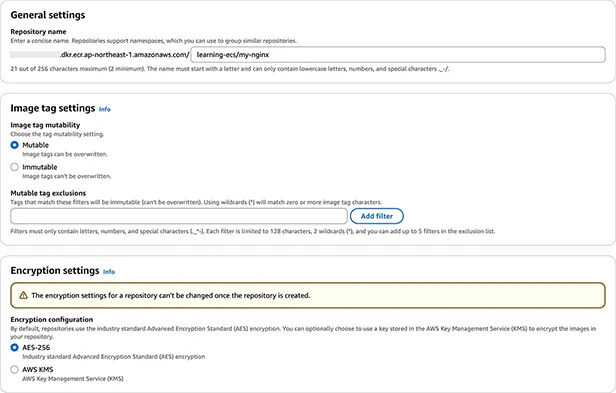
- Fill the wizard with the following information:
- Repository name: learning-ecs/my-nginx
- Image tag mutability: Mutable
- Encryption: AES-256
- Click “Create”.
Create Dockerfile
We could use default Nginx’s default config file. But in order to show you how to deploy ECS service that uses an Docker image from an ECR private repository, and optimize ALB’s health check handling, we will make our own image derived from Nginx image.
- Open terminal on your local computer.
- Navigate to your working directory.
- Create Dockerfile.
touch Dockerfile- Paste the following code to Dockerfile.
FROM nginx:1.30.0-alpine3.23-slim
COPY ./default.conf.template /etc/nginx/templates/default.conf.template- Create default.conf.template.
touch default.conf.template- Paste the following code to default.conf.template.
server {
    listen 80;
    listen [::]:80;
    server_name localhost;

    # Application load balancer health check
    location = /healthcheck.txt {
        access_log off;
        add_header Content-Type text/plain;
        return 200 'ok';
    }

    location / {
        root   /usr/share/nginx/html;
        index  index.html index.htm;
    }
}
Nginx image will outputs /etc/nginx/conf.d/*.conf from files saved as /etc/nginx/templates/*.template, interpreting environment variables. Nginx image, by default, does not support environment variables. The configuration file above does not any environment variable, so making a template is unnecessary. I prefer, however, that the original configuration files untouched, and in the real world it is likely that the environment variables would be used. For more information about how Nginx templates work, please refer to nginx - Official Image | Docker.
Build/Push Image
With Docker file ready, please proceed the following steps from your local computer:
- Start Docker.
- Authenticate Docker to ECR registry.
aws ecr get-login-password --region REGION | docker login --username AWS --password-stdin AWS_ACCOUNT_ID.dkr.ecr.REGION.amazonaws.com- Build your local Docker image.
docker build -t my-nginx .- Tag your image with your ECR Repository URI.
docker tag my-nginx:latest AWS_ACCOUNT_ID.dkr.ecr.REGION.amazonaws.com/learning-ecs/my-nginx:latest- Push your image to ECR.
docker push AWS_ACCOUNT_ID.dkr.ecr.REGION.amazonaws.com/learning-ecs/my-nginx:latest- Go back to AWS console “ECR > Private registry > Repositories > learning-ecr/my-nginx”.
- Confirm the “latest” tag has been pushed.
Create ECS
In ECS, we will make the following resources:
- Task definition × 1
- Cluster × 1
- Service × 1
Create Task Definition
- Go to “ECS > Task definitions”.
- Click “Create new task definition”.
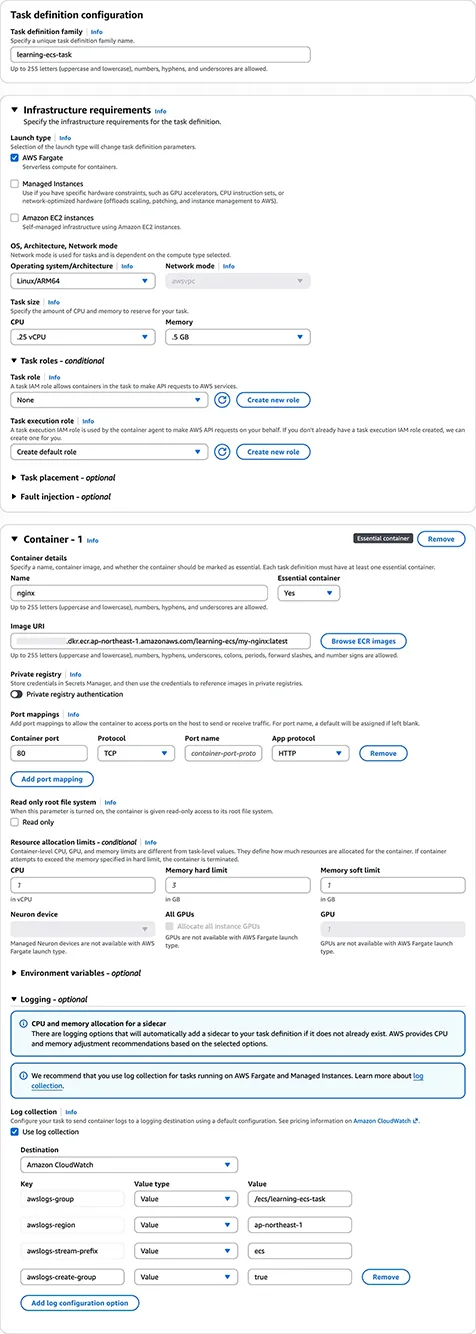
- Fill the wizard with the following information:
- Task definition family: learning-ecs-task
- Launch type: AWS Fargate
- Operating system/Architecture: (Must match your local computer’s. See note below.)
- CPU: 0.25 vCPU
- Memory: .5GB
- Task role: None
- Task execution role: Create default role
- Container:
- Name: Nginx
- Essential container: Yes
- Image URL: aws_account_id.dkr.ecr.region.amazonaws.com/learning-ecs/my-nginx:latest
- Container port: 80
- Protocol: TCP
- App protocol: HTTP
- Use log collection: Check
- Click “Create”.
About the operating system/architecture. Since our docker image is built on local computer, the architecture of ECS task must match your local computer’s architecture. For most modern macOS users, the CPU architecture is ARM64. So you must select Linux/ARM64. For Windows users, please check your computer’s specification, and select the proper architecture. Whether your OS is macOS or Windows, the Linux tasks will be able to be run the image—at least for Nginx.
For the IAM role. By selecting “Create default role” in the task execution field, the console will creates the IAM role called ecsTaskExecutionRole with the managed policy AmazonECSTaskExecutionRolePolicy. If you have created the same role before, selection “Create default role” will not the create the new role and the existing ecsTaskExecutionRole will be used.
Create Cluster
- Go to “Clusters”.
- Click “Create cluster”.
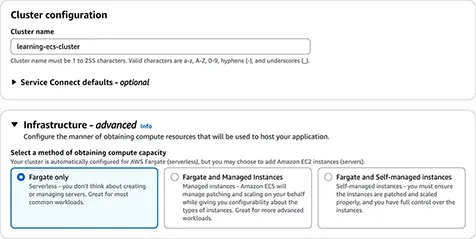
- Fill the wizard with the following information:
- Cluster name: “learning-ecs-cluster”
- Select a method of obtaining compute capacity: “Fargate only”
- Click “Create”.
Create Service
- On the Clusters page, click “learning-ecs-cluster”.
- In the Services section, click “Create”.
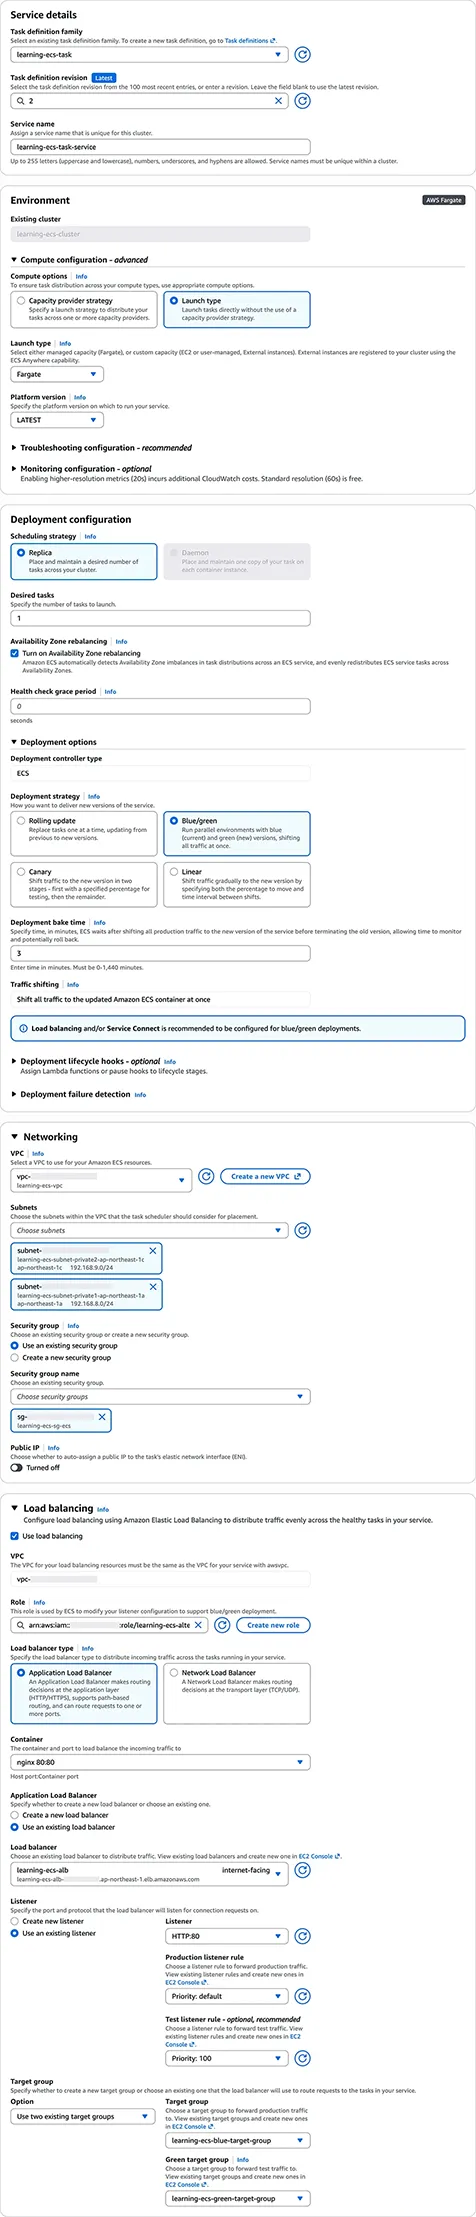
- Fill the wizard with the following information:
- Task definition family: learning-ecs-task
- Task definition: 1 (Select the latest revision)
- Service name: learning-ecs-task-service
- Compute options: Launch type
- Launch type: Fargate
- Platform version: LATEST
- Scheduling strategy: Replica
- Desired tasks: 1
- Turn on Availability Zone rebalancing: Check
- Deployment controller type: ECS
- Deployment strategy: Blue/green
- Deployment bake time: 3
- Networking:
- VPC: learning-ecs-vpc
- Subnets:
- learning-ecs-subnet-private1-regiona
- learning-ecs-subnet-private2-regionc
- Security group: Use an existing security group
- Security group name: learning-ecs-sg-ecs
- Public IP: Turned off
- Load balancing
- Use load balancing: Check
- Role: Create a new role
- Role name: learning-ecs-alternate-target-role
- Additional policy: No additional policy
- Load balancer type: Application Load Balancer
- Container: nginx 80:80
- Application Load Balancer: Use an existing load balancer
- Load balancer: learning-ecs-alb
- Listener: Use an existing listener
- Listener: HTTP:80
- Production listener rule: Priority: default
- Test listener rule: Priority: 100
- Target group:
- Option: Use existing target groups
- Target group: learning-ecs-blue-target-group
- Green target group: learning-ecs-green-target-group
- Click “Create”.
Deploy
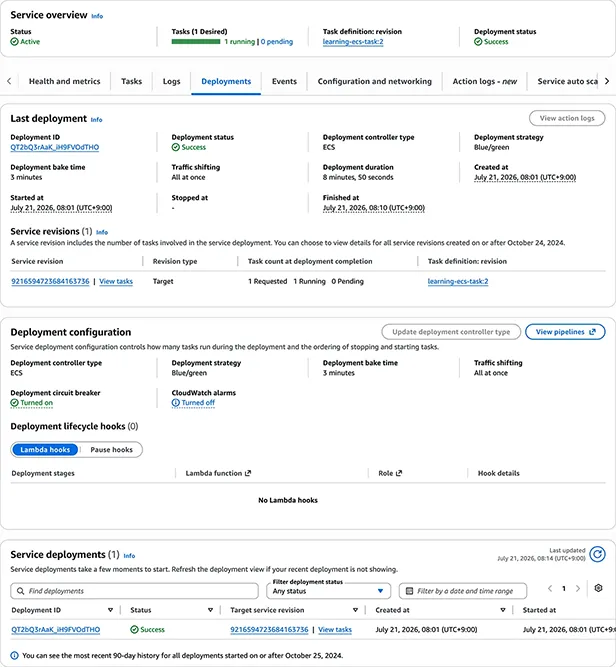
Right after you click the Create button in the ECS service wizard, you will be navigated to the cluster dashboard.
- Click “learning-ecs-task-service” in the Services section.
- Select “Deployments” in the tab menu.
You can see the detail of current deployment. After three minutes one task reached to the steady(running) state, since we set the bake time of three minutes in the wizard, the deployment status should be success.
- Go to “EC2 > Load Balancers > learning-ecs-alb”.
- Copy “DNS name”.
- Paste the DNS to the URL bar of your browser.
You should be seeing the Nginx welcome page at the ALB’s DNS.
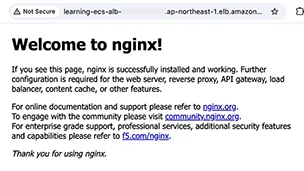
You can also health check by navigating the URL to /healthcheck.txt. This time you will see the plain text “ok”.
Cost management
When running ECS services in the private subnets, what each team must ask is “VPC endpoints and NAT Gateways, which are cheaper?” The short answer is, when 4 interface endpoints are necessary, VPC endpoints. One NAT Gateways costs 4.5 times as one endpoint does. When number of endpoints is less than 5, VPC endpoints are always cheaper. The problem’d emerge when we needs more than four of them. And that’s frequent because running the ECS uses up all four spots. When more than four of endpoints are necessary, which resource is cheaper depends the amount of data handled.
I created AWS NAT Gateway–VPC Endpoint Cost Calculator to optimize the cost regarding the network surrounding the private ECS service.
Troubleshooting
The most probable causes for errors are networking and permission. You might want to check out AWS’s official troubleshooting or keep reading to know the errors that I encountered during my test.
Networking Errors
Networking errors can occur in two places in our architecture:
- Between private subnet to VPC endpoint
- Between security group to security group
Private Subnet – VPC endpoint
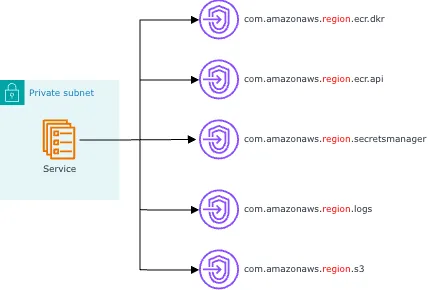
The figure above illustrates that each private subnet needs five VPC endpoints to AWS services. Lacking any one of them the ECS service deployment would fail because it cannot pull a Docker image from ECR. Please check the following configuration:
- All VPC endpoints are attached to all private subnet.
- All VPC endpoints are to the correct AWS services.
- The VPC endpoint to S3 exists. (The endpoint to S3 had been created via VPC’s wizard, not the endpoint’s.)
Security Group – Security Group
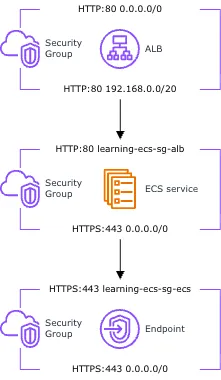
The figure above illustrates that security groups and their rules between resources.
The security group of ALB requires an HTTP inbound rule from anywhere IPv4 since the ALB faces the Internet. The ALB’s security group also requires an HTTP outbound rule to 192.168.0.0/20, that is our VPC’s CIDR.
The security group of ECS service requires an HTTP inbound rule from the ALB’s security group, learning-ecs-sg-alb, and an HTTPS outbound rule to anywhere IPv4. At my first attempt I set the outbound rule only to 192.168.0.0/20 but I had a network timeout.
The security group of VPC endpoints requires an HTTP inbound rule from the ECS’s security group, learning-ecs-sg-ecs, and an HTTPS outbound rule to anywhere IPv4.
Permission Errors
Besides IAM user/role that you act on AWS, the ECS service requires two IAM roles:
- ECS task execution role
- Alternating target group role
ECS task execution role pulls Docker images from ECR and run containers. This role must have the following permissions:
{
    "Version": "2012-10-17",
    "Statement": [
        {
            "Effect": "Allow",
            "Action": [
                "ecr:GetAuthorizationToken",
                "ecr:BatchCheckLayerAvailability",
                "ecr:GetDownloadUrlForLayer",
                "ecr:BatchGetImage",
                "logs:CreateLogStream",
                "logs:PutLogEvents"
            ],
            "Resource": "*"
        }
    ]
}
AWS has a managed policy called AmazonECSTaskExecutionRolePolicy, and this policy would have been automatically attached to the role when the role was created while creating a task definition on console.
Alternating target group role, for each service deployment, updates the weights of load balancer’s target groups so that the target group A has 100% weight when the target group B has 0% weight, while the target group B has 100% weight when the target group A has 0% weight. To alternate target groups, the role must have the following permissions:
{
    "Version": "2012-10-17",
    "Statement": [
        {
            "Sid": "ELBReadOperations",
            "Effect": "Allow",
            "Action": [
                "elasticloadbalancing:DescribeListeners",
                "elasticloadbalancing:DescribeRules",
                "elasticloadbalancing:DescribeTargetGroups",
                "elasticloadbalancing:DescribeTargetHealth"
            ],
            "Resource": "*"
        },
        {
            "Sid": "TargetGroupOperations",
            "Effect": "Allow",
            "Action": [
                "elasticloadbalancing:RegisterTargets",
                "elasticloadbalancing:DeregisterTargets"
            ],
            "Resource": "arn:aws:elasticloadbalancing:*:*:targetgroup/*/*"
        },
        {
            "Sid": "ALBModifyListeners",
            "Effect": "Allow",
            "Action": "elasticloadbalancing:ModifyListener",
            "Resource": [
                "arn:aws:elasticloadbalancing:*:*:listener/app/*/*/*"
            ]
        },
        {
            "Sid": "NLBModifyListeners",
            "Effect": "Allow",
            "Action": "elasticloadbalancing:ModifyListener",
            "Resource": [
                "arn:aws:elasticloadbalancing:*:*:listener/net/*/*/*"
            ]
        },
        {
            "Sid": "ALBModifyRules",
            "Effect": "Allow",
            "Action": "elasticloadbalancing:ModifyRule",
            "Resource": [
                "arn:aws:elasticloadbalancing:*:*:listener-rule/app/*/*/*/*"
            ]
        }
    ]
}
AWS has a managed policy called AmazonECSInfrastructureRolePolicyForLoadBalancers, and this policy would have been automatically attached to the role when the role was created while creating a ECS service on console.
Clean up
After completed this guide, please do not forget to destroy the resources you created. Running a Fargate ECS service, with three VPC endpoints in each AZ, behind the ALB costs over $100 a month. The following AWS services are used in this guide:
- VPC
- ELB
- ECR
- ECS
- IAM
All resources that would have been created are listed in the AWS Resources at the beginning of this blog. I’ve put my effort to list all resources but please double check on your own whether any other resource were created.