Drop & Upload File Tutorial - Step 3: React-ify with Babel & webpack
This is a third and last step of the step-by-step tutorial on building a Drop & Upload application with React. The each step covers:
- Step 1: Drag and Drop with FileReader in native Javascript
Before we dive into building a React application, first let us understand how the basic Drag & Drop API works. - Step 2: Save files on the server with Ajax & Express.js
Using Express, we make the app able to save the dropped images on the server. We will send the data of images to the server through XML HttpRequest. - Step 3: React-ify with Babel & webpack
To make it more adaptable to the modern web development, we will turn the app from Step 2 into a React app.
In the Step 2, we made a very simple Drop & Upload application with Express and Ajax API. The app itself is sufficient for the minimum functionality, but we shall move on. Let’s make it a React app.
In order to build a React app, we are also going to use Webpack to compile and bundle the codes we write in ES6 syntax. Along with the support of Browsersync, we automatically reload the browser when any of our React-related Javascript files is changed. I’m not going to explain how to use Webpack, just give you sample task code. But if you are not familiar with it and want to know about it, this tutorial might be also a good place to learn Webpack.
Prerequisite
- Node.js & npm
- Yarn (replaceable with npm)
- Familiarity with ES6 syntax or Babel
- (Basic knowledge in the backend Javascript)
- (Done the Step 2)
To upload files by dropping, the reader of this tutorial are encourage to understand FileReader API in advance. It is possible to follow this tutorial without understanding the FileReader API or following the previous steps of this tutorial, however, if you want to know about FileReader in detail, please check out the article from HTML5 Rocks or the Step 1.
If you just want to grab the source code, please visit Github.
Now let’s get started.
File Structure
The file structure of the codes used in this step is as follows:
.
└ build
	└ …
└ index.html
└ node_modules
	└ …
└ package.json
└ server.js
└ src
	└ DropUploadFile.js
	└ DropZoneBox.js
	└ Output.js
	└ Thumbnail.js
	└ UploadStatus.js
	└ index.js
└ style.css
└ uploads
└ webpack.config.js
└ yarn.locks
Please create these files executing the following commands:
mkdir react-drop-upload && cd react-drop-upload
mkdir build src uploads
touch index.html server.js style.css webpack.config.js
cd src
touch index.js DropUploadFile.js DropZoneBox.js UploadStatus.js Output.js Thumbnail.js
cd ../
The package.json and yarn.locks will be generated at yarn commands.
Prepare Development Environment
The main modules being used in this app are:
- React: Javascript framework for View
- Axios: XMLHttpRequests maker
- Babel: Javascript compiler
- Express: web application framework
- Formidable: form data parser
- Nodemon: Change monitor & server restarter
First, initialize NPM project.
$ yarn initAfter generating a package.json, let’s install required packages.
$ yarn add axios express formidable
$ yarn add --dev react react-dom babel-core babel-loader babel-preset-es2015 babel-preset-react
$ yarn add --dev webpack browser-sync browser-sync-webpack-plugin nodemon npm-run-all
Next, write NPM scripts to package.json for developing the app.
package.json
{
  …
  "scripts": {
    "start-dev": "npm-run-all --parallel start watch",
    "start": "nodemon server.js --watch server.js",
    "build": "webpack",
    "watch": "webpack --watch"
  },
  …
}
The script we mostly use is start-dev, which executes the two scripts registered simultaneously with the support of npm-run-all module. Webpack deals with the whole process of development. So please add the code below to the webpack.config.js.
webpack.config.js
const path = require('path');
const webpack = require('webpack');
const BrowserSyncPlugin = require('browser-sync-webpack-plugin');

module.exports = {
	devtool: 'source-map',
	entry: {
		main: './src/index.js'
	},
	output: {
		filename: '[name].bundle.js',
		path: path.resolve(__dirname, 'build'),
		sourceMapFilename: '[file].map'
	},
	module: {
		loaders: [
			{
				test: /\.js$/,
				loader: 'babel-loader',
				query: {
					presets: ['es2015', 'react']
				}
			}
		]
	},
	// watch: true,
	plugins: [
		new webpack.optimize.CommonsChunkPlugin({
			name: 'vendor',
			minChunks: function (module) {
				// this assumes your vendor imports exist in the node_modules directory
				return module.context && module.context.indexOf('node_modules') !== -1;
			}
		}),
		new webpack.optimize.CommonsChunkPlugin({
			name: 'manifest'
		}),
		new BrowserSyncPlugin({
			host: 'localhost',
			port: 3100,
			proxy: 'http://localhost:3000',
			open: false,
		})
	]
}
I’ve seen many tutorials that simply bundle all files including NPM modules. But here above, I decided to use CommonsChunkPlugin(). CommonsChunkPlugin enables us to separate the NPM modules, which barely change throughout the development, from the final bundled file and only compiles what we write specifically for our app. Because of this, we can improve the performance of bundling process. For more information about CommonsChunkPlugin, please visit their official guide.
The server.js hasn’t been changed since the Step 2. So please refer to the code in the Step 2 or Github.
Write Hello world or something inside index.html and then run:
$ yarn startThis will execute nodemon and run server at http://localhost:3000. If you see the message you wrote, the server is running properly. The nodemon will watch the changes of server.js and restart the server when it’s changed. Now you are ready to develop the front-end part regarding Drop & Upload UI.
HTML & CSS
The index.html has been slightly changed since the Step 2. The names of loading files are updated because this time we need to load bundled files. For style.css, it’s not changed at all since the first step. Both files are not that important in this tutorial. So for the both of files please grab the codes at index.html and style.css from Github.
Thinking about React
One thing I like the most about React is that it works like an integration of DOM and OOP, and which make us understand and build applications more easily than before even when you switch to Javascript from another programming language. Furthermore, now ES6 syntax makes it even easier.
HTTP or HTML are originally designed to exchange a vast amount of plain texts—just as its named indicate “Text.” Nowadays, however, the most of websites—or the most of websites which draw most of traffics—require a lot of actions with users. The best example is e-commerce. People don’t visit their website to read about the products but buy a product. In another words, the modern websites are softwares, rather than a document.
This text-based concept often makes things harder when we want to build web applications and attain certain functionalities from DOM elements. Of course it was not impossible to do it, developers have been working with the traditional Javascript for decades. But even if we could, it was somewhat not intuitive for those who are familiar with other OOP languages. And that is why, I think, React and ES6 came in. Plus, that’s where Javascript is heading to in next few years.
Let’s see how this Drop & Upload React app works.
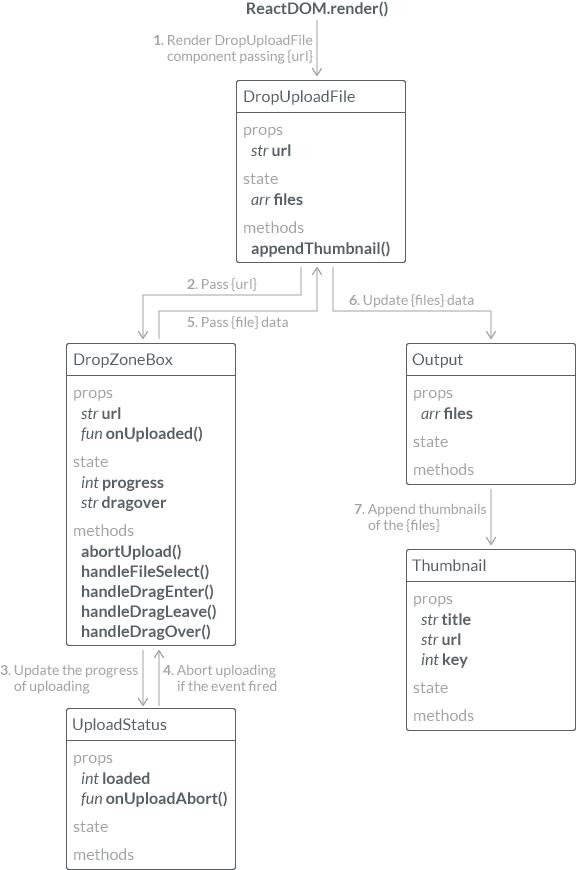
In my view, there are two crucial features in React: state and props. As a state, you can virtually assign a number of data directly to a DOM element, which is now called a React component. Once the state of one React component changes, it efficiently updates and renders a new view. The props is a property through which React components access to the data passed from its parental component, and that’s how you share one data throughout several components. These two features, which what Facebook describes as declarative and component-based, make it possible to create rich interactive UIs easily.
Now, it’s time to write Javascript.
Javascript
All javascript files shown below must be located under src directory.
index.js
import React from 'react';
import ReactDOM from 'react-dom';
import DropUploadFile from './DropUploadFile.js';

ReactDOM.render(
	<DropUploadFile url="/upload" />,
	document.getElementById('root')
);
DropUploadFile.js
import React from 'react';
import DropZoneBox from './DropZoneBox';
import Output from './Output';

export default class DropUploadFile extends React.Component {

	constructor(props) {
		super(props);
		this.state = { files: [] };
		this.appendThumbnail = this.appendThumbnail.bind(this);
	}

	appendThumbnail(f) {
		f._id = Date.now();

		let files = this.state.files;
		let newFiles = files.concat([f]);
		this.setState({files: newFiles});
	}

	render() {
		return (
			<div className="wrapper">
				<h1>Drop & Upload Files</h1>
				<DropZoneBox url={this.props.url} onUploaded={this.appendThumbnail} />
				<Output files={this.state.files} />
			</div>
		);
	}
}
DropZoneBox.js
import React from 'react';
import axios from 'axios';
import UploadStatus from './UploadStatus';

let CancelToken = axios.CancelToken;
let source = CancelToken.source();

export default class DropZoneBox extends React.Component {

	constructor(props) {
		super(props);
		this.state = {
			progress: 0,
			dragover: ''
		}
		this.abortUpload = this.abortUpload.bind(this);
		this.handleFileSelect = this.handleFileSelect.bind(this);
		this.handleDragEnter = this.handleDragEnter.bind(this);
		this.handleDragLeave = this.handleDragLeave.bind(this);
	}

	abortUpload(e) {
		e.stopPropagation();
		e.preventDefault();
		source.cancel();
		this.setState({progress: 0});
		console.log('Uploading aborted.');
	}

	handleFileSelect(e) {
		e.stopPropagation();
		e.preventDefault();
		this.setState({dragover: ''});
		this.setState({progress: 0});

		let files = e.dataTransfer.files;

		for (let i=0, f; f=files[i]; i++) {
			if ( !f.type.match('image.*') ) continue;

			let formData = new FormData();
			formData.append("index", i);
			formData.append("image", f);

			axios.post(this.props.url, formData, {
				onUploadProgress: (e) => {
					if (e.lengthComputable) {
						let loaded = Math.round((e.loaded / e.total) * 100);
						this.setState({progress: loaded});
					}
				},
				cancelToken: source.token
			}).then(response => {
				let data = response.data;
				let readingFile = files[data.index];
				console.log(data.filename + ' uploaded');

				let reader = new FileReader();
				reader.onload = () => {
					let newFile = {
						name: readingFile.name,
						url: reader.result
					};
					this.props.onUploaded(newFile);
				}
				reader.readAsDataURL(readingFile);

			}).catch(err => {
				console.log(err);
			});

		}
	}

	handleDragEnter(e) {
		e.stopPropagation();
		e.preventDefault();
		this.setState({dragover: 'dragover'});
	}

	handleDragLeave(e) {
		e.stopPropagation();
		e.preventDefault();
		this.setState({dragover: ''});
	}

	handleDragOver(e) {
		e.stopPropagation();
		e.preventDefault();
		e.dataTransfer.dropEffect = 'copy';
	}

	render() {
		return(
			<div id="dropZoneBox">
				<div
					id="dropZone"
					className={this.state.dragover}
					onDragEnter={this.handleDragEnter}
					onDragLeave={this.handleDragLeave}
					onDragOver={this.handleDragOver}
					onDrop={this.handleFileSelect}>
					Drop files here to upload
				</div>
				<h6>Upload Status</h6>
				<UploadStatus loaded={this.state.progress} onUploadAbort={this.abortUpload} />
			</div>
		);
	}
}
You may want to check out Axios’ official documentation for how to use it.
UploadStatus.js
import React from 'react';

export default class UploadStatus extends React.Component {

	render() {
		let loaded = this.props.loaded;
		let zeros = '';

		if (loaded >= 0 && loaded < 10) zeros = '00';
		else if (loaded < 100) zeros = '0';

		let progress = zeros + loaded.toString();
		let progressBar = {width: loaded.toString() + '%'};

		return(
			<table id="progressTable">
				<tbody>
					<tr>
						<th><b><span id="progress">{progress}</span>%</b></th>
						<td>
							<div className="progressBar">
								<div id="progressBar" style={progressBar}></div>
							</div>
							<button id="abortButton" onClick={this.props.onUploadAbort}><span></span></button>
						</td>
					</tr>
				</tbody>
			</table>
		);
	}
}
Output.js
import React from 'react';
import Thumbnail from './Thumbnail';

export default class Output extends React.Component {

	render() {
		let thumbnailNodes = this.props.files.map(file => {
			return(
				<Thumbnail title={file.name} url={file.url} key={file._id} />
			);
		});
		return(
			<output id="output">{thumbnailNodes}</output>
		);
	}
}
Thumbnail.js
import React from 'react';

export default class Thumbnail extends React.Component {

	render() {
		let divStyle = {
			backgroundImage: 'url(' + this.props.url + ')'
		};

		return(
			<div className="file">
				<picture>
					<div className="thumb" title={this.props.name} style={divStyle}></div>
				</picture>
			</div>
		);
	}
}
If you compare the code with the one in the Step 2, you’ll find that most of codes are reused, and also find how you turn a pure Javascript application into a React app. The DOM elements become React components, global variables become assigned to each associating React component.
Let’s Run App
To build a bundled Javascript file:
$ yarn buildTo keep watching the changes of src/*.js:
$ yarn watchTo run a server and an app:
$ yarn startThe application will be run at http://localhost:3000.
With Browsersync
Run a server & refresh a browser when src/*.js changed:
$ yarn start-devThis time the application will be run at http://localhost:3100, the port number is changed as a proxy for the port 3000.
The codes of this application is originally from HTML5 Rocks. In their post, they design the process of FileReader just for handling image files. Hence, this app also accepts only image files. This only-file logic is written as if ( !f.type.match('image.*') ) continue;.
What’s Next
In this three steps of tutorial—how to create a Drop & Upload application with React—We learned so far the basic use of FileReader, drag & drop UI, Ajax, webpack, and how to turn the traditional Javascript application into React app. In spite of the all effort you’ve done in this tutorial, this application still needs much more improvements to make it production ready. Generally speaking it’s required to do two more things.
The first thing you have do is to save the information of uploaded files, such as file name or path, to database. Typically you store the path of file and make it accessible via UI. The second thing you want to do is to upload the file not to the server on which your app is running, but to AWS S3 bucket or other third party storage server. Adding these two features are more involved in the back-end effort, and since the primary focus of this tutorial is on React, which is perceived to be more for front-end, I omitted the implementation of those two features. It makes it much harder to understand in anyway. Probably I’ll write about these implementation in future, not extent to the React but as one definitive technology.
If you want to learn more about React I recommend React Getting Started — The MERN Stack Tutorial! (feat. ES6!) by Bryan Gilbraith on Medium. Its UI design of comment application is based on the previous React’s official tutorial. But he also covers storing comment to MongoDB. The UI designs of Drop & Upload and commenting are very similar, it might help you to understand my application by following his tutorial, or vice versa.
Hope this tutorial helps you understand and get familiar with modern Javascript techniques, especially React.