How to Create a Daily Scheduler with React in TypeScript - Part 2
Add and List
This is the part two of tutorial on how to create a simple front-end daily scheduler with React in TypeScript. In this article I am going to show you how to add an ADD and LIST features to our scheduler app.
The daily scheduler looks like this:
You can see the live demo.
The tutorial is divided into three parts:
The source code of this tutorial is available at GitHub. The source code at the end of this article is saved as 02-add-list directory.
Variables
It would be cumbersome to define variables as they are needed. Let’s first define all variables relating to our daily scheduler logics.
First, please create daily-scheduler-util.ts with touch command:
touch ./src/daily-scheduler/daily-scheduler-util.tsThen declare the variables:
./daily-scheduler/daily-scheduler-util.ts
const LEFT = 1; // ID to define the left side of schedule item
const RIGHT = 2; // ID to define the left side of schedule item
const DEFAULT_HOUR_START = 0; // default starting hour of scheduler

let hour1 = 0; // starting hour in the scheduler
let hour2 = 0; // ending hour in the scheduler

let step = 2; // number of steps the schedule to be snapped to in a hour. "step = 2" means you can enter each schedule by 30 minutes.

let date1: Date; // date of starting hour
let date2: Date; // date of ending hour, that is "date1 + 1-day"
let date1String: string; // date string of "date1" in ISO format, e.x. "2024-01-01"
let date2String: string; // date string of "date2" in ISO format

let dragging: boolean; // whether a user is dragging or not

let o: number; // horizontal coordinate of left side of track element within the application's viewport
let x1: number | null; // horizontal coordinate(clientX) of mousedown event

let schedules: ScheduleItem[]; // list of schedule items
let trash: number[] = []; // list of IDs of deleted schedules

let dragPosition: 1 | 2 | null; // left or right side of schedule item when the user triggers "mousedown" event
let guides: number[]; // list of "offsetLeft", relative to the parent track element, that schedule items must snap to.
let datetimes: string[]; // list of datetime strings corresponding to the "guides", e.x. ["2024-01-01 00:00", "2024-01-01 00:30", …]

let hours: number[]; // list of hours to be drawn, e.x. [0, 1, 2, …, 0];

let minX: number | null; // minimum horizontal coordinate that a schedule item can extend
let maxX: number | null; // maximum horizontal coordinate that a schedule item can extend
I wrote inline comments to explain that each variable is for what. The source code does not include the comments.
A few variables—LEFT, RIGHT, dragging, dragPosition—are not used in this part. They will be used in the part three.
There are a few more things to note about the variables.
Guides and Datetimes
The figure below shows the idea of UI Guidelines and the variables guides and datetimes.
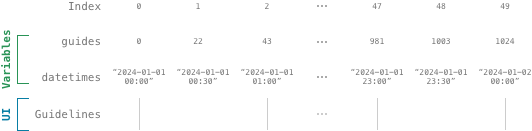
In the next section, we are going to add a Guidelines component. This Guidelines and the variable guides are different things. The Guidelines is a number of gray lines that indicate visually the coordinates of hours in the scheduler. On the other hand, the guides is a list of offsetLeft values that schedule items must snap to relative to the parent element. Since we set step = 2, we can enter schedules by thirty minutes frame. Roughly a half of guides overlap the UI guidelines. Other half, invisible to users, are positioned at the middle of each couple of guidelines.
The datetimes is a list of datetime strings which correspond to guides. For example, if one of schedule item extends from guides[0] to guides[2], the start and end of datetimes of that schedule item will be translated into “2024-01-01 00:00” and “2024-01-01 01:00”.
Schedules
In the part one, I explained that there is a variant of Schedule called ScheduleItem. While Schedule represents the data model of schedule, ScheduleItem represents the graphical user interface of schedule.
To recap the types, here is the interfaces:
declare interface Schedule {
  id?: number;
  title?: string;
  start: string;
  end: string;
  note?: string;
  category?: ScheduleCategory;
  category_id?: number;
  user_id?: number;
}

declare interface ScheduleItem {
  id?: number;
  start: number;
  end: number;
  category: ScheduleCategory;
  category_id: number;
}
In daily-scheduler-util.ts, schedules are handled only as ScheduleItem. The only exception is when we want to convert ScheduleItem into Schedule and vice versa.
Init
The initialization must take place before any rendering of daily scheduler components. Please open the App.tsx and add a few lines of code:
./App.tsx
import { init } from "./daily-scheduler/daily-scheduler-util";
…

function App() {
  init("2024-01-01", 0);

  …
}
Now add the following code to daily-scheduler-util.ts:
./daily-scheduler/daily-scheduler-util.ts
export function init(dateString: string, hour: number): void {
  setHours(hour);
  setDate(dateString);
  setDatetimes();
  emptyTrash();
}

export function setHours(hour: number): void {
  hour1 = hour2 = hour | DEFAULT_HOUR_START;

  const diff = 24 - hour1;
  const length = diff + hour2 + 1;
  let t = hour1;
  let i: number;
  hours = new Array(length);

  function appendHour(): void {
    hours[i] = t;
    t++;
  }

  for (i = 0; i < diff; i++) appendHour();

  t = 0;

  for (; i < length; i++) appendHour();
}

export function setDate(dateString: string): void {
  date1 = new Date(dateString);
  date2 = new Date(date1.getTime() + 86400000); // 1000 * 3600 * 24
  date1String = date1.toISOString().substring(0, 10);
  date2String = date2.toISOString().substring(0, 10);
}

export function setDatetimes(): void {
  const length = hours.length * step - step + 1;
  const hoursLastIndex: number = hours.length - 1;
  let i: number = 0;
  let j: number;
  let k: number;
  let d: Date;

  datetimes = new Array(length);

  function createDateTimeString(dateString: string) {
    return dateString + " " + d.toISOString().substring(11, 19);
  }

  function fillStep(dateString: string) {
    d = new Date(3600000 * (hours[i] + k / step));
    datetimes[j + k] = createDateTimeString(dateString);
  }

  function fillHour(dateString: string) {
    j = i * step;

    for (k = 0; k < step; k++) fillStep(dateString);
  }

  fillHour(date1String);

  for (i = 1; hours[i] !== 0; i++) fillHour(date1String);
  for (; i < hoursLastIndex; i++) fillHour(date2String);

  j = i * step;
  k = 0;

  fillStep(date2String);
}

export function emptyTrash(): void {
  trash = [];
}
The init function accepts two argument: ISO-formatted dateString and starting hour of scheduler. The init sets up the target date of scheduler and generates hours and datetimes based on the given arguments. It also empties the trash.
Guidelines
Please create Guidelines.tsx with touch command:
touch ./src/daily-scheduler/Guidelines.tsxNow copy and paste the following code to the file:
./daily-scheduler/Guidelines.tsx
import { useEffect, useRef, useMemo } from "react";
import { getHours, setO, setGuides } from "./daily-scheduler-util";

export default function Guidelines() {
  const hours = useMemo<number[]>(() => getHours(), []);
  const ref = useRef<HTMLDivElement>(null);

  useEffect(() => {
    setGuides(ref.current as HTMLDivElement);
    setO(ref.current?.getBoundingClientRect().x as number);
  }, []);

  return (
    <div ref={ref} className="guidelines">
      {hours.map((i, index) => (
        <span key={index} className="guideline">
          <span>{i}</span>
        </span>
      ))}
    </div>
  );
}
We don’t modify Guidelines.tsx anymore in the tutorial.
Next, add the following code to daily-scheduler-util.tsx
./daily-scheduler/daily-scheduler-util.ts
export function getHours(): number[] {
  return hours;
}

export function setO(x: number): void {
  o = x;
}

export function setGuides(element: HTMLDivElement): void {
  const length: number = hours.length * step - step + 1;
  const hoursLastIndex: number = hours.length - 1;
  const lines: NodeListOf<HTMLSpanElement> =
    element.querySelectorAll(".guideline");
  let i: number, j: number, k: number;
  let x: number, diff: number;

  guides = new Array(length);

  if (step === 1) {
    for (let i = 0; i < length; i++) guides[i] = lines[i].offsetLeft;

    return;
  }

  function fillStep() {
    guides[j + k] = x + Math.round((diff * k) / step);
  }

  function fillInHour() {
    j = i * step;
    x = lines[i].offsetLeft;
    diff = lines[i + 1].offsetLeft - x;

    for (k = 0; k < step; k++) fillStep();
  }

  for (i = 0; i < hoursLastIndex; i++) fillInHour();

  guides[length - 1] = lines[hoursLastIndex].offsetLeft;
}
After that, let’s insert newly created Guidelines to DailyScheduler:
./daily-scheduler/DailyScheduler.tsx
…
import Guidelines from "./Guidelines";
…

export default function DailyScheduler(props: {
  schedules?: Schedule[];
}): JSX.Element {
  …

  return (
    <div className="daily-scheduler">
      …
      <div className="track">
        <Guidelines />
      </div>
    </div>
  );
}
If you run the application now, you see the gray lines that indicate the hours of the day.

Adding
Please create NewScheduleTrack.tsx with touch command:
touch ./src/daily-scheduler/NewScheduleTrack.tsxThe inside of NewScheduleTrack.tsx is:
./daily-scheduler/NewScheduleTrack.tsx
import { useState, useRef } from "react";
import {
dragStart,
dragEnd,
getStartAndEndOnGrid,
canAddSchedule,
setHorizonOnGrid,
} from "./daily-scheduler-util";
import type { MouseEvent as ReactMouseEvent } from "react";
export default function NewScheduleTrack({
category,
addSchedule,
}: {
category: ScheduleCategory;
addSchedule(schedule: ScheduleItem): void;
}) {
const [schedule, setSchedule] = useState<{
start: number;
end: number;
} | null>(null);
const ref = useRef<HTMLDivElement>(null);
function handleMouseDown(e: ReactMouseEvent): void {
if (e.button !== 0 || !canAddSchedule(e.clientX)) return;
dragStart(e.clientX);
setHorizonOnGrid(e.clientX);
window.addEventListener("mousemove", handleMouseMove);
window.addEventListener("mouseup", handleMouseUp);
}
function handleMouseMove(e: MouseEvent): void {
setSchedule(getStartAndEndOnGrid(e.clientX));
}
function handleMouseUp(e: MouseEvent): void {
const { start, end } = getStartAndEndOnGrid(e.clientX);
dragEnd();
setSchedule(null);
window.removeEventListener("mousemove", handleMouseMove);
window.removeEventListener("mouseup", handleMouseUp);
if (end - start < 1) return;
const category_id = category.id;
addSchedule({ start, end, category, category_id });
}
return (
<div ref={ref} className="new-schedule-track" onMouseDown={handleMouseDown}>
{schedule && (
<div
className="schedule-item"
style={{
width: schedule.end - schedule.start,
left: schedule.start,
backgroundColor: category.fill,
borderColor: category.stroke,
}}
></div>
)}
</div>
);
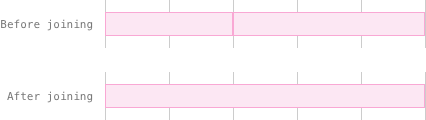
}This might look very complicated but it’s just a simple basic mousedown, mousemove, and mouseup events.
Upon mousedown, we first check if there is other schedule at the mousedown position. If so, we do nothing. If not, we tell daily-scheduler-util the coordinate of cursor x1, and set the min/max coordinates that a new schedule can extend to in a context which there are other schedule entries already and we cannot overbook.
While mousemove, we keep watching the coordinate of cursor, getting the information which guide to guide a new schedule must extend. With this information, We render a rectangle passing the style which of left and width calculated from the coordinate.
When mouseup happens, we get the start and end coordinates, and add a new schedule to schedules of DailyScheduler.
We must add the following functions to daily-scheduler-util.ts:
./daily-scheduler/daily-scheduler-util.ts
export function dragStart(x: number): void {
  setDragging(true);
  setX1(x);
}

export function dragEnd(): void {
  setDragging(false);
  setX1(null);
  setDragPosition(null);
  clearHorizon();
}

export function setDragging(boo: boolean): void {
  dragging = boo;
}

export function setX1(x: number | null): void {
  if (x === null) {
    x1 = null;

    return;
  }

  x1 = o + snapToGuide(x - o);
}

export function snapToGuide(x: number): number {
  let i = 0;
  let diff1 = Math.abs(x - guides[0]);
  let diff2 = Math.abs(x - guides[1]);

  while (diff1 > diff2) {
    i++;
    diff1 = diff2;
    diff2 = Math.abs(x - guides[i + 1]);
  }

  return guides[i];
}

export function setDragPosition(n: 1 | 2 | null): void {
  dragPosition = n;
}

function clearHorizon(): void {
  minX = null;
  maxX = null;
}

export function getStartAndEndOnGrid(x2: number): {
  start: number;
  end: number;
} {
  x1 = x1 as number;
  x2 = o + snapToGuide(x2 - o);

  let start: number;
  let end: number;
  const dx = x2 - x1;

  if (dx > 0) {
    start = x1 - o;
    end = Math.min(x2 - o, maxX as number);
  } else {
    start = Math.max(x2 - o, minX as number);
    end = x1 - o;
  }

  return { start, end };
}

export function canAddSchedule(x: number): boolean {
  let boo = true;

  if (schedules.length === 0) return boo;

  const start = x - o;

  for (let i = 0; i < schedules.length; i++) {
    if (start >= schedules[i].start && start <= schedules[i].end) {
      boo = false;
      break;
    }
  }

  return boo;
}

export function setHorizonOnGrid(x: number): void {
  minX = 0;
  maxX = guides[guides.length - 1];

  if (schedules === null || schedules.length === 0) return;

  const start = x - o;

  for (let i = 0; i < schedules.length; i++) {
    if (start >= schedules[i].end && minX <= schedules[i].end)
      minX = schedules[i].end;
    if (start <= schedules[i].start && maxX >= schedules[i].start)
      maxX = schedules[i].start;
  }
}
Let’s insert NewScheduleTrack into DailyScheduler:
./daily-scheduler/DailyScheduler.tsx
import { useState, useEffect } from "react";
…
import { joinSchedules, updateSchedules } from "./daily-scheduler-util";
import NewScheduleTrack from "./NewScheduleTrack";
…

export default function DailyScheduler(props: {
  schedules?: Schedule[];
}): JSX.Element {
  …

  function addSchedule(schedule: ScheduleItem): void {
    const ss = joinSchedules([...schedules, schedule]);
    setSchedules(ss);
  }

  useEffect(() => {
    updateSchedules(schedules);
  }, [schedules]);

  return (
    <div className="daily-scheduler">
      …
      <div className="track">
        …
        <NewScheduleTrack category={activeCategory} addSchedule={addSchedule} />
      </div>
    </div>
  );
}
Now we have to add a few more functions to daily-scheduler-util.ts:
./daily-scheduler/daily-scheduler-util.ts
export function joinSchedules(ss: ScheduleItem[]): ScheduleItem[] {
  for (let i = ss.length - 1; i > 0; i--) {
    const s1 = ss[i];

    for (let j = i - 1; j > -1; j--) {
      const s2 = ss[j];

      if (s1.category_id !== s2.category_id) continue;
      if (s1.end === s2.start) {
        ss[j].start = s1.start;
        addTrash(s1);
        ss.pop();
        break;
      } else if (s1.start === s2.end) {
        ss[j].end = s1.end;
        addTrash(s1);
        ss.pop();
        break;
      }
    }
  }

  return ss;
}

export function addTrash(schedule: ScheduleItem): void {
  if (!schedule.id) return;

  trash.push(schedule.id);
}

export function updateSchedules(ss: ScheduleItem[]): void {
  if (ss.length === 0) {
    schedules = [];

    return;
  }

  schedules = ss;
}
The joinSchedules is a function that combines the two or three schedules in the same category next each other into one entry.
The updateSchedules is a function for that daily-scheduler-util always have the shallow copy of schedules as DailyScheduler. This is very crucial because if UI and the data handler have the different values of schedules, the application would break. That is why we have to invoke updateSchedules every time schedules of DailyScheduler changes.
You can now add a schedule as a data though the new schedule will disappear from the screen when you mouse up. Now move on to render those disappearing schedules.

Listing
Please create Schedules.tsx and Schedule.tsx with touch command:
touch ./src/daily-scheduler/Schedules.tsx ./src/daily-scheduler/Schedule.tsxPlease paste the following code to Schedules.tsx
./daily-scheduler/Schedules.tsx
import Schedule from "./Schedule";

export default function Schedules({ items }: { items: ScheduleItem[] }) {
  return (
    <>
      {items.map((i, index) => (
        <Schedule key={index} index={index} {...i} />
      ))}
    </>
  );
}
And the code below to Schedule.tsx:
./daily-scheduler/Schedule.tsx
import { useRef } from "react";

export default function Schedule({
  id,
  start,
  end,
  category,
  category_id,
  index,
}: ScheduleItemIndexable) {
  const ref = useRef<HTMLDivElement>(null);
  const style = {
    backgroundColor: category.fill,
    borderColor: category.stroke,
    left: start,
    width: end - start,
  };

  return <div ref={ref} className="schedule-item" style={style}></div>;
}
The Scheduler’s style—left and width—will be calculated from its start and end values, just like when we render a new schedule item while mousemove.
Let’s insert Schedules into DailyScheduler:
./daily-scheduler/DailyScheduler.tsx
…
import Schedules from "./Schedules";
…

export default function DailyScheduler(props: {
  schedules?: Schedule[];
}): JSX.Element {
  …

  return (
    <div className="daily-scheduler">
      …
      <div className="track">
        …
        <Schedules items={schedules} />
      </div>
    </div>
  );
}
That is the end of modification to the scheduler UI in this article.
We want to know whether schedules are actually stored as data. To do that, we are going to add a button which invokes a function to get the schedule data from the scheduler util.
Please make a few adjustment to App.tsx and add two functions to daily-scheduler-util.ts.
./App.tsx
import {
  init,
  getSchedules,
  getTrash,
} from "./daily-scheduler/daily-scheduler-util";
…

function App() {
  function handleClick() {
    console.log("schedules", getSchedules());
    console.log("trash", getTrash());
  }

  …

  return (
    <div className="App">
      …
      <br />
      <button type="button" onClick={handleClick}>
        console.log
      </button>
    </div>
  );
}
./daily-scheduler/daily-scheduler-util.ts
export function getSchedules(): Schedule[] {
  const length = schedules.length;

  if (length === 0) return [];

  let s: ScheduleItem;
  const ss: Schedule[] = new Array(length);

  function findIndexStart(guidelineX: number) {
    return guidelineX === s.start;
  }

  function findIndexEnd(guidelineX: number) {
    return guidelineX === s.end;
  }

  for (let i = 0; i < length; i++) {
    s = schedules[i];
    const index1 = guides.findIndex(findIndexStart);
    const index2 = guides.findIndex(findIndexEnd);
    const start = datetimes[index1];
    const end = datetimes[index2];
    ss[i] = { ...s, start, end };
    delete ss[i].category;
  }

  return ss;
}

export function getTrash(): number[] {
  return trash;
}
The getSchedules() converts ScheduleItem into Schedule. The conversion process goes like this. The function first gets the index of guides with the schedule’s start and end. Each index of guides and datetimes correspond to each other. For instance, if we find the index of schedule item’s start 4, the datetime string of that schedule’s start would be datetimes[4]. The same logic applies to end as well. We can get the datetime string of one ScheduleItem by using the index of guides for datetimes. It takes the same process over each schedule item.
If you run the application now, you can add multiple schedules and see them.

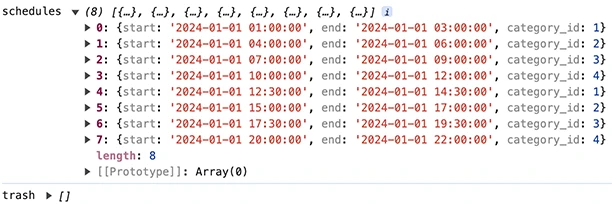
When you click the console.log button, you see data like below in the console:
That’s all.
Next
In the next article we will add UPDATE, REMOVE, and initial data loading features to our scheduler app.