Copy Docker Images & Containers To New Mac
Recently you got a new Mac, which is a great thing. However, it comes with some pains. And one common pain of those is migration. You can restore whole data and settings on you new computer easily by using Time Machine. But it is occasional that you don’t want to inherit previous settings, which is totally mess.
If you are a developer, you might have already Docker on your computer. So when it comes to migrating Docker and its environment, the first method you would come up with might be to create a Docker image, push it to Docker Hub, and then pull that image on your new PC. But this requires a great amount of data transfer. So you might wonder is there a better way? It is.
In this article I’m going to show you how to manually migrate the Docker environment to your new Mac.
Docker-machine that will be migrated
On my old Mac I had the only one docker-machine named default. So I’m going through this article as in the case of migrating default on the old Mac to default on the new one. When you do this on your own, please replace the name of docker-machine with yours.
Just in case I provide the both old and new versions of docker I used and am using.
Old Mac:
- Docker version 1.9.1
- docker-machine version 0.5.3
New Mac:
- Docker version 1.11.1
- docker-machine version 0.7.0
Prerequisites
- Virtualbox
- Docker
I won’t show you how to install Virtualbox and Docker here. So if you want to know how to install them, please visit their official pages.
Steps
- Backup Docker files
- Create a new docker-machine
- Copy disk.vmdk
- Copy cert files
- Change Virtualbox's storage
- Start machine & regenerate certs
Backup Docker files
First thing you need to do is to backup your Docker files. Docker files are stored under /Users/username/.docker. If you have a backup on your Time Machine, in the later steps you can directly copy Docker files from it.
Create a new docker-machine
On your new Mac, you want to create a new docker-machine with the same name. Please do following commands on the Terminal:
$ docker-machine create --driver virtualbox default
$ docker-machine stop default
$ docker-machine ls
The last command above returns something look like this.
NAME      ACTIVE   DRIVER       STATE     URL   SWARM   DOCKER    ERRORS
default   -        virtualbox   Stopped                 Unknown
To proceed, let’s now open the two Finder windows: one for the backup on the right, another for the new on the left, and guide both windows to the corresponding location in which the files of docker-machine are stored, and that is ~/.docker/machine/machines/default/.
The directory .docker is invisible, but you access to it by pressing command + shift + G and type the path. With this you can even open the .docker directory inside the external drive. This process will make it easy for you to understand and for me to explain.
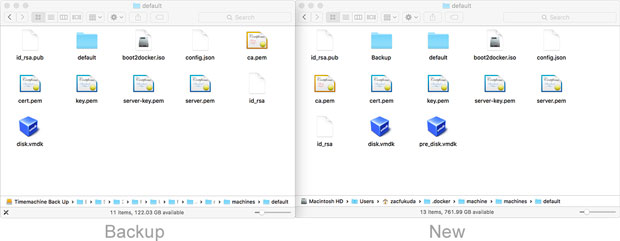
Copy disk.vmdk
After creating a machine and opening the directory in Finder, what you need to do is to copy the disk.vmdk to the new docker-machine directory. What you need to be careful is that when you copy, you must not overwrite the existing disk.vmdk. So when you copy the backup file, give it a new name such as pre_disk.vmdk.
Copy cert files
Note: Here I’m showing the steps that just worked for me. I haven’t tested through the alternative methods. Probably you can skip this step.
In the new docker-machine directory, create a new directory called Backup or something you prefer. Put the certs files listed below into that directory and copy the same files from your backup.
Certs files to be backup and copied:
- id_rsa
- ca.pem
- cert.pem
- key.pem
- server-key.pem
- server.pem
- id_rsa.pub
Change Virtualbox's storage
Open the Virtualbox application. Select default, move your mouse on SATA port1, then right click. It pops up the small window showing the available disk images. Please choose pre_disk.vmdk that you just copied from the backup.
Now when you start the default docker-machine, it uses pre_disk.vmdk as its storage.
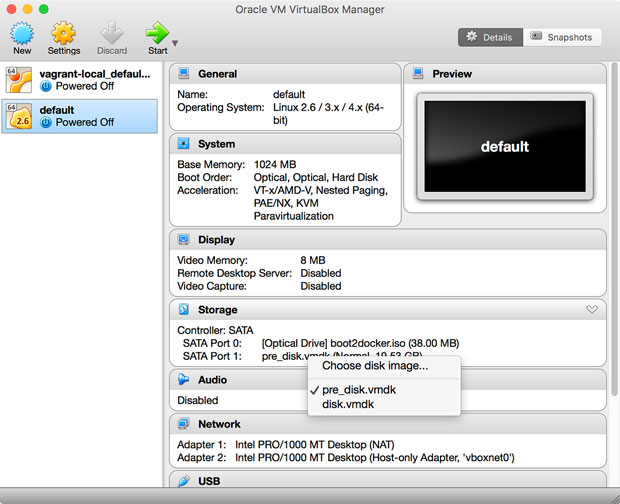
You don’t need Virtualbox application anymore, so you can close it.
Start machine & regenerate certs
Now back to the Terminal, and start the docker-machine.
$ docker-machine start default
$ docker-machine env default
After you execute env command, it alerts that your TLS connection fails because the certifications and keys don’t match. Docker have a handful command to solve this problem.
$ docker-machine regenerate-certs defaultTo be the change affected, you need to restart the machine.
$ docker-machine restart default
$ docker-machine env default
This time it returns the values of Docker environment. Let’s set that values and see if your migration has been done properly.
$ eval $(docker-machine env default)
$ docker images
$ docker ps -a
If you get the list of images and containers you previously have on your old Mac, your migration is completed.