Contact Form 7 Dynamic Data Options with Advanced Custom Fields
Get Option Values from Database Continued
In the previous article, I showed you how to dynamically generate options in Contact Form 7(CF7) on server side. In this post I am going to walk you through how to integrate Advanced Custom Fields(ACF) with CF7, to generate field options from post meta or the options stored in wp_options table in the database.
I use Repeater and Options Page features, which are available only in the pro version of ACF, to make the administration easier.
The pro version is $49/year for 1 website, $249/year for unlimited websites. I would like to remind you that they don’t pay me to promote their pro version.
I will show you the two cases of implementation:
- Options from Page(Post) meta
- Options from WordPress Options
Options from Page Meta
The first case that I want to show you is to get options from the meta values of the page. This meta-page relations are stored in the wp_postmeta table in the database.
Here I use About page as an example.
After downloading and activating ACF, please follow the instruction.
Add New Field Group
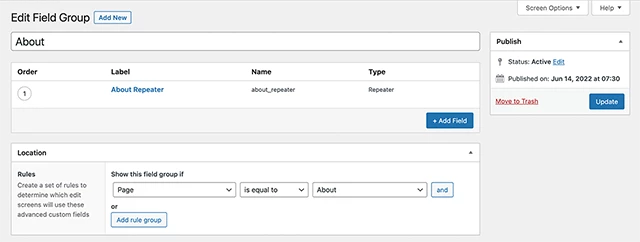
The first thing you should do is to create a meta field group for the page. On dashboard, please go to Custom Fields > Add New.
I name the field group “About”, and link this field to the About page in the Location section.
You only need one main field. Please add a new field with the following information:
- Label: About Repeater
- Name: about_repeater
- Field Type: Repeater
- Layout: Row (optional)
To this point the field would look like:
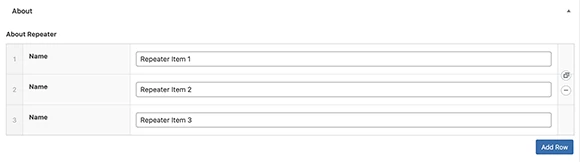
As a sub field of repeater, let’s add a text field with the following information:
- Label: Name
- Name: name
- Field Type: Text

After entering all required settings, please save the field group.
Save Meta
Go to the page that you link the field group to—About in my case—and add a dummy values in the fields displayed at the bottom of the editor.
I simply put “Repeater Item 1”, “Repeater Item 2”, and “Repeater Item 3”.
If you haven’t pasted the shortcode of Contact Form 7 to the content, please do so now.
Form Tag
Inside the form editor, please paste the following code:
[radio about use_label_element default:1 data:about_repeater]Filter
The last thing to do is to write some business logic inside the filter to parse the data type that we just defined.
If you have followed the previous post, please add a new condition to the existing code. If you haven’t, please remove “…” and copy&paste it.
functions.php
add_filter('wpcf7_form_tag_data_option', function($data, $options, $args) {
	$data = [];
	foreach ($options as $option) {
		…
		if ($option === 'about_repeater') {
			$repeater = get_field($option);
			$items = array_map(function($item) {
				return $item['name'];
			}, $repeater);
			$data = array_merge($data, $items);
		}
	}
	return $data;
}, 10, 3);
Note that get_field(); by default gets the meta values of the global $post object. If you try to call this form on the pages that have no about_repeater meta, the shortcode will show no options.
The above steps will result the next HTML:

Options from Options Page
The problem of getting options from the post’s meta values is that those values are linked to the specific page, making it bit more difficult to use the same values throughout multiple pages and forms.
Sometimes this problem can be good though. In a situation which you have a product line, and each product has its own color options, you could define a data type “product_color”, embed the same form for all products but show the different color options based on the current product being viewed.
Anyway, in this post I want to show you how to make options globally accessible from any page. To do so we use WordPress’ options interface. And to use that interface we use ACF’s acf_add_options_page().
Add Options Page
The options page feature provides a set of functions to add extra admin pages to edit ACF fields!
says ACF.
I might have to explain what options page is, but that is a broader topic to cover inside this article. If you don’t know what options page is, please visit ACF’s documentation Options Page.
Adding a new options page is very easy with ACF. Please add the next code to your functions.php.
functions.php
add_action('acf/init', function() {
	if (function_exists('acf_add_options_page')) {
		acf_add_options_page([
			'page_title' => __('CF7 Data Options'),
			'menu_title' => 'CF7 Data Options',
			'menu_slug' => 'cf7-data-options',
		]);
	}
});
This code will add a new menu CF7 Data Options to the dashboard. (If you haven’t given the position value, the new page should appear at the bottom of the menu with the gear icon.)
Add New Field Group
After you confirmed that the new options page appears in the dashboard, let’s make a new field group for that page.
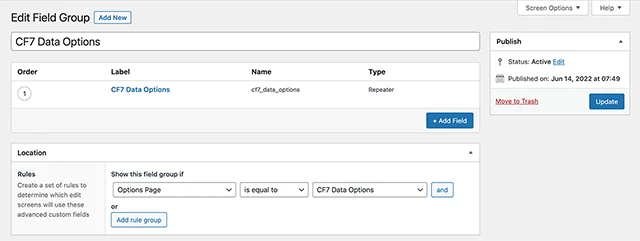
Please go to Custom Fields > Add New once again.
I name the field group CF7 Data Options, and in the Location section set the rule as Options Page is equal to CF7 Data Options.
Just like for the About page, we only need one Repeater field as a test. Please add a new field with the following information:
- Label: CF7 Data Options
- Name: cf7_data_options
- Field Type: Repeater
- Layout: Row (optional)
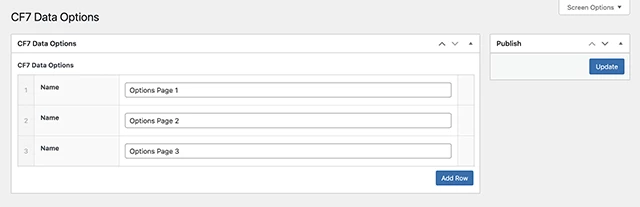
As a sub field of repeater, let’s add a similar text field as the About page:
- Label: Name
- Name: name
- Field Type: Text
The editing page shall look like as below:
Save Options
Next, go to the CF7 Data Options you created with acf_add_options_page()—not the field group you’ve just made—and save some options. I saved the next values.
Form Tag
Being options stored in the database, please go to your CF7 form editor, and add the following form tag:
[select options_page include_blank data:cf7_data_options]Filter
Now we are ready to filter the new data type and get the options from the database. Please add the new condition to your functions.php
functions.php
add_filter('wpcf7_form_tag_data_option', function($data, $options, $args) {
	$data = [];
	foreach ($options as $option) {
		…
		if ($option === 'cf7_data_options') {
			$repeater = get_field($option, 'option');
			$items = array_map(function($item) {
				return $item['name'];
			}, $repeater);
			$data = array_merge($data, $items);
		}
	}
	return $data;
}, 10, 3);
Now all is done. Go to the page you embedded the form shortcode. That will show you HTML that looks like this:

Summary
In the previous and this post I showed you how to dynamically generate form options in Contact Form 7. I love WordPress. My clients love it, too. One of reason why we love WordPress is that it comes with lots of plugins. The method I just showed you could be achievable by the other or additional plugin. Then why did I write this post?
One more plugin can make the application slower. The new plugin cannot be compatible with some other plugins. You never know that plugin will keep up with the updates of WordPress. There could be a software virus hidden. More data to save in database. The more the data, the less mobile the app.
There are lots of reasons you should avoid plugins as much as possible.
I believe that development of web applications requires discipline. To obtain discipline, we might need to choose the hard path. And that hard path is to write the code.